Someone on your sales team has a call with Meridian Freight in ten minutes. They open the account and look for the state of play: what is open, how big, how close.
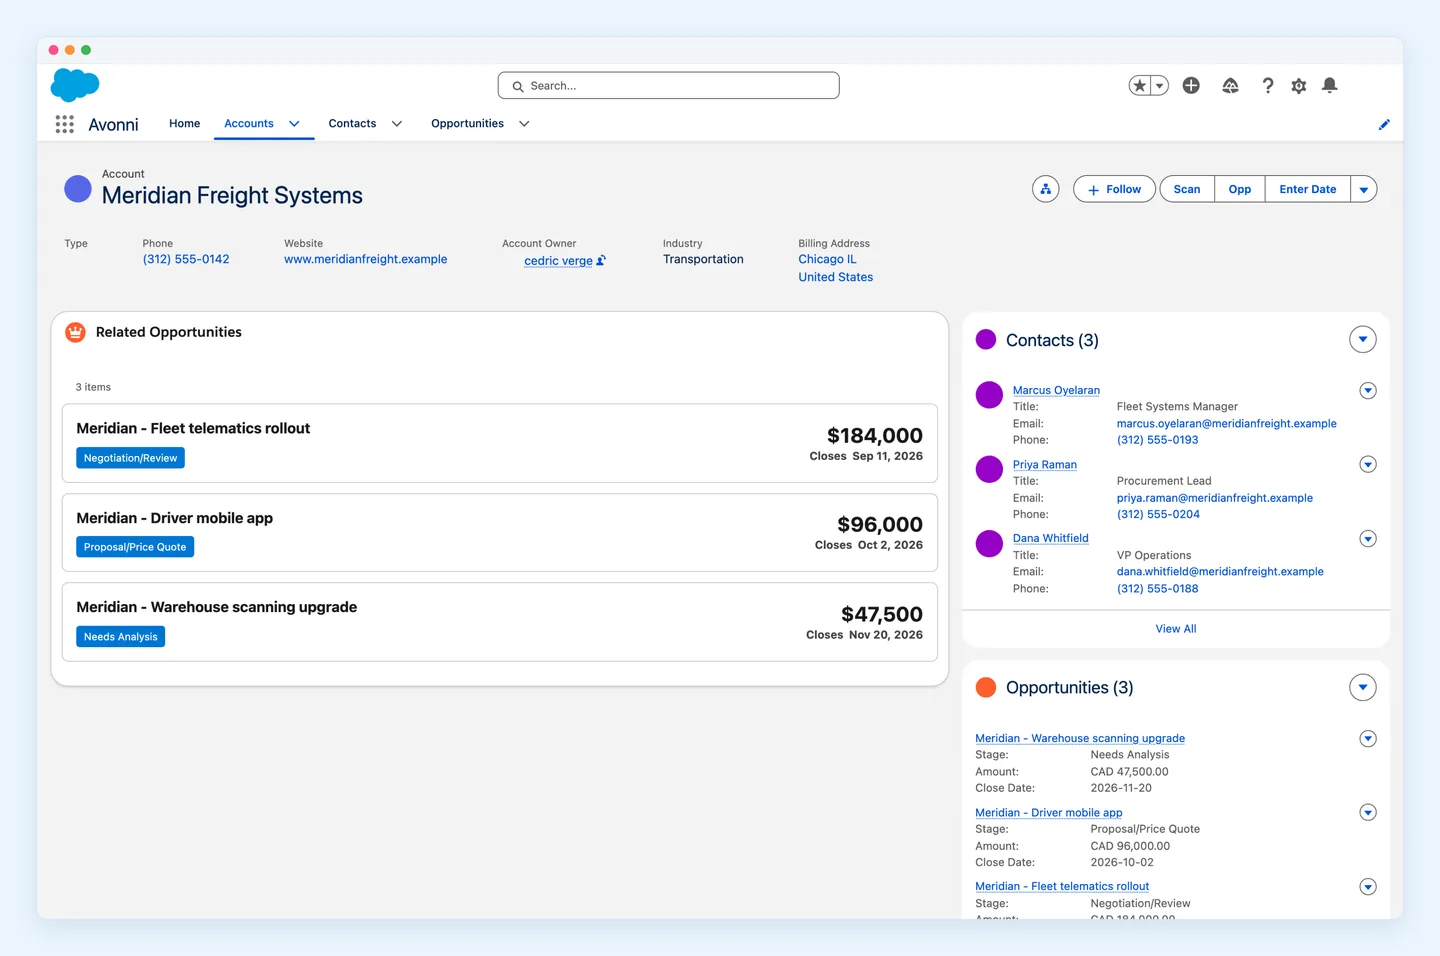
Here is the page they land on. Look at the right side first, then the left.
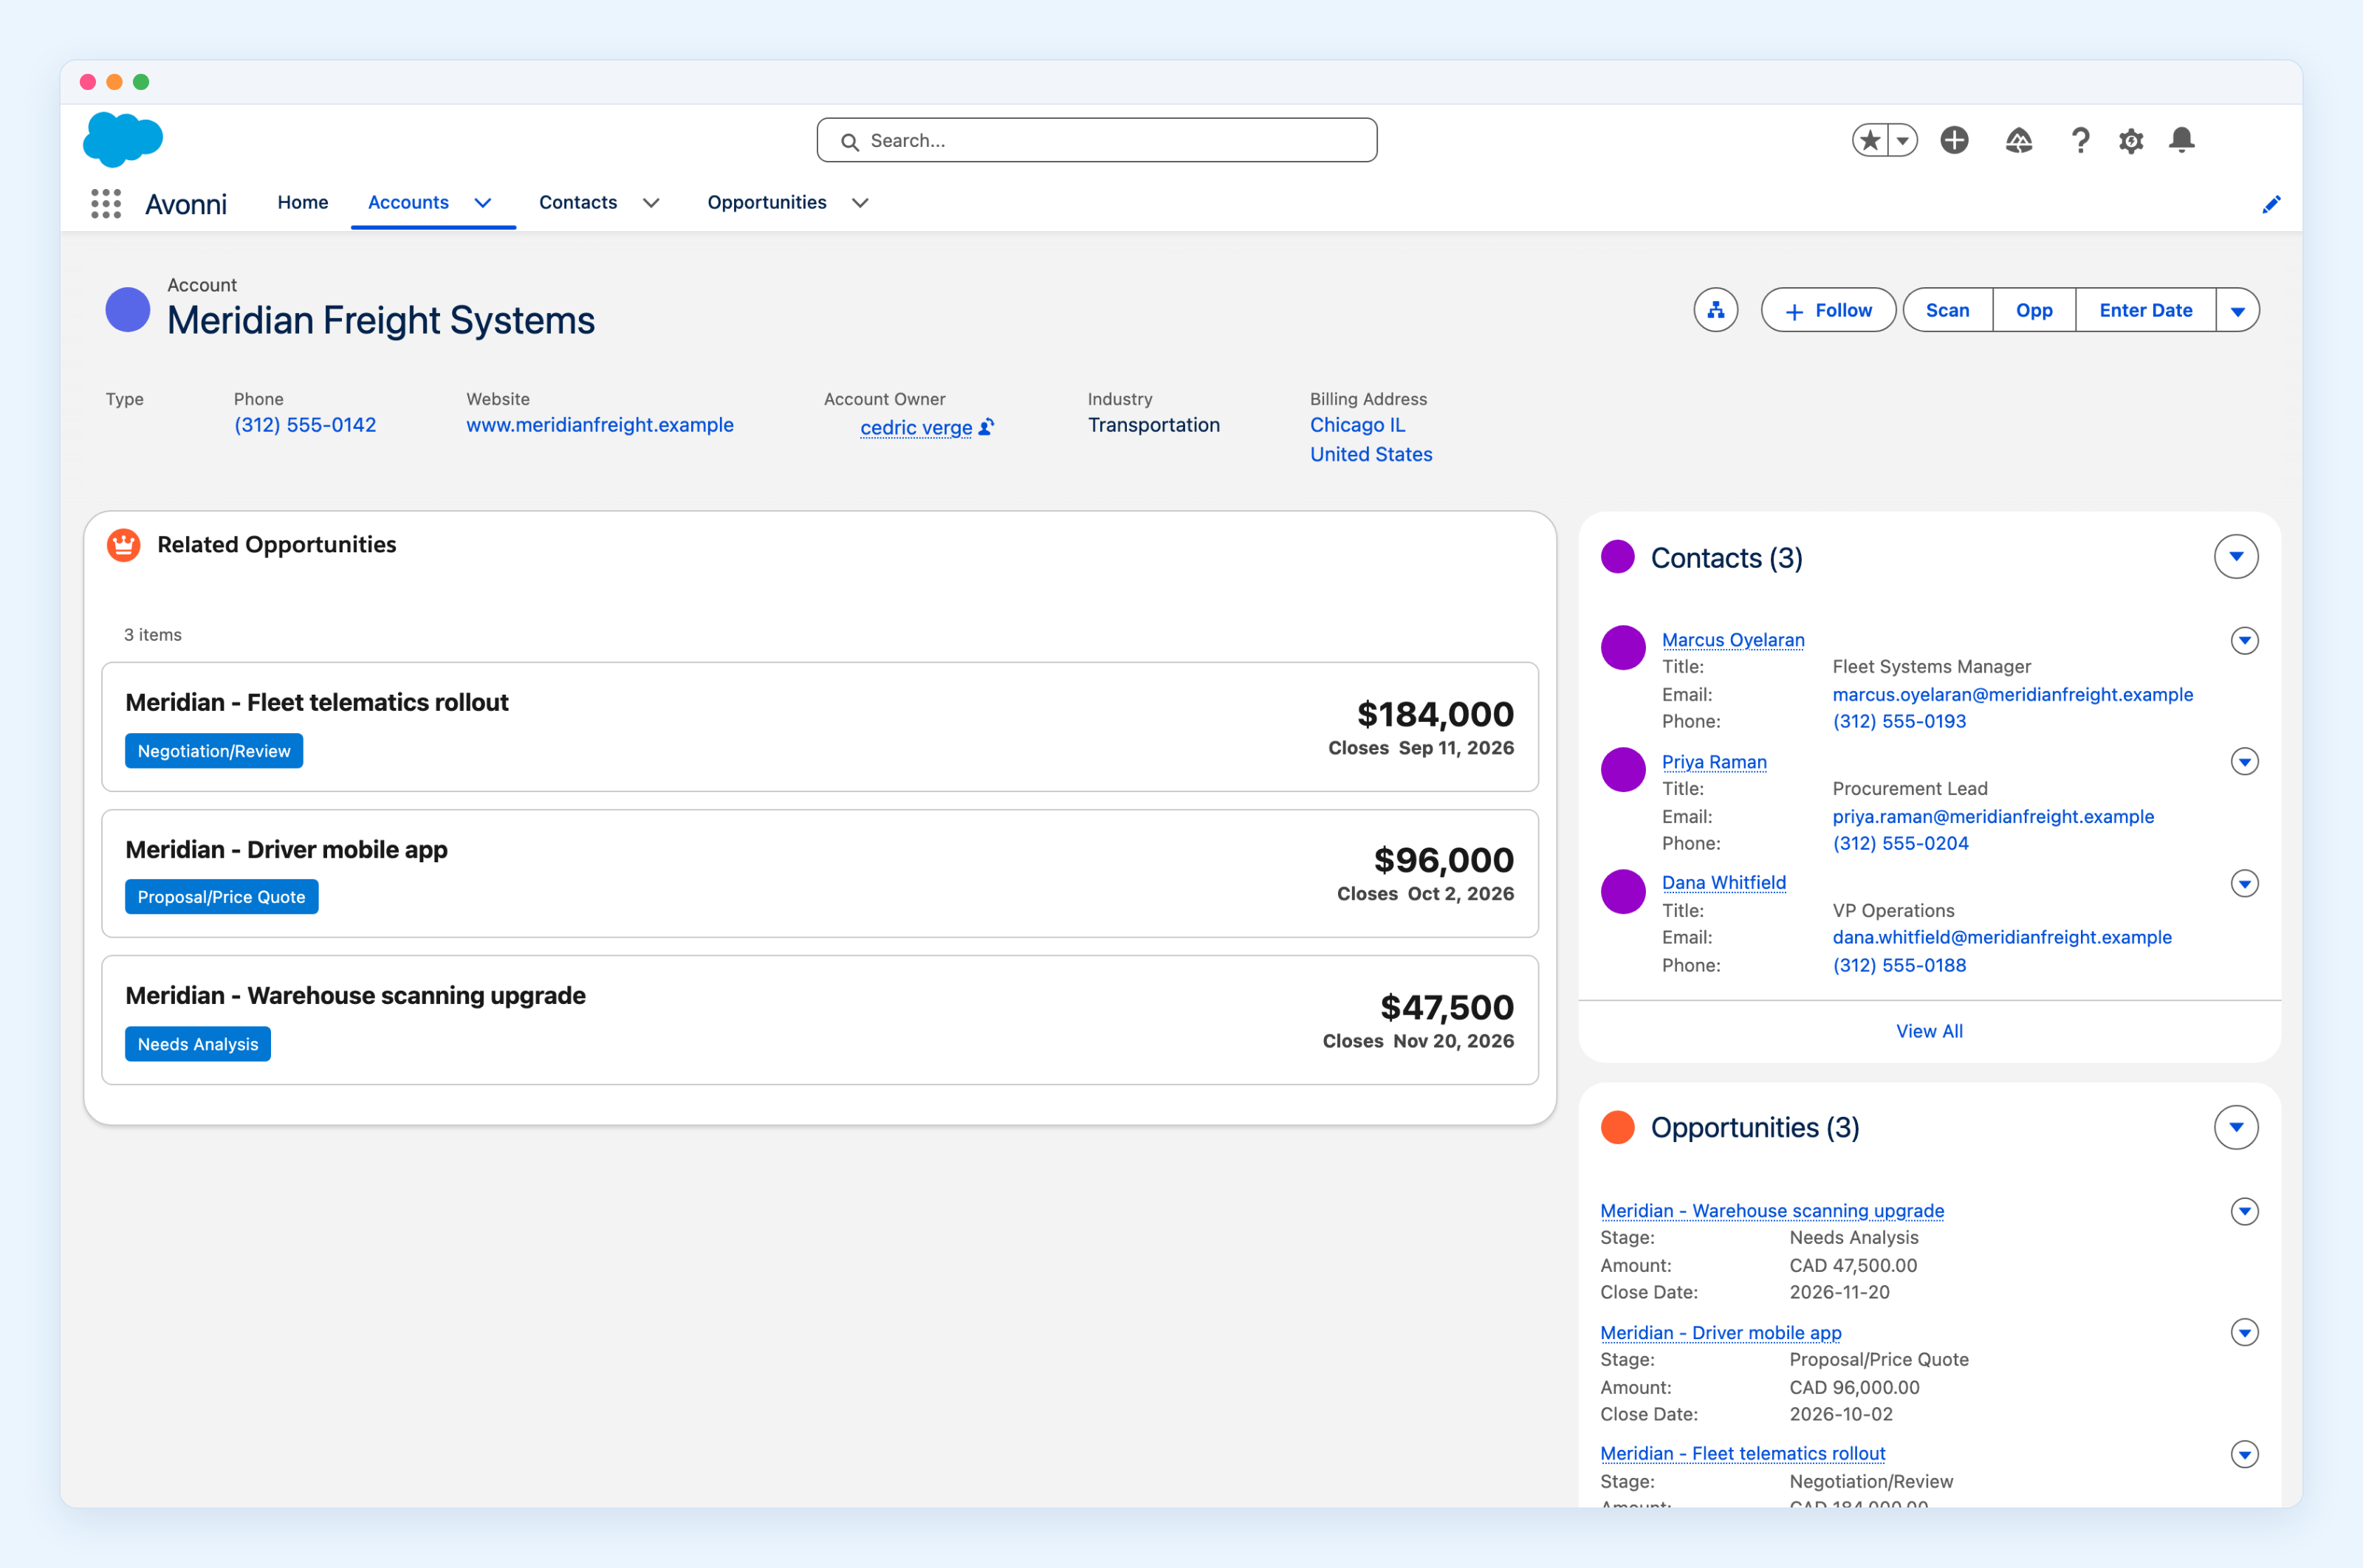
Right side, the standard related list: blue links, stage in grey text, amounts you compare one at a time. Accurate, and useless in the ten seconds before a call.
Left side, the same three records on the same page. The stage is a badge. The amounts line up. The nearest close date sits on top.
Same data. Same page. Ten minutes of work, once you have done it once.
What it takes: Avonni Dynamic Components installed in your org, and the Component Builder that comes with it. No Apex, no Visualforce, nothing to deploy. Open a sandbox and follow along.
1. Start a component and open the builder
A Dynamic Component is one you assemble yourself rather than one you install already built. You compose it from parts in a builder, and what comes out is a real Lightning component: it shows up in the Lightning App Builder alongside the standard ones, and you can put it on a record page, an app page, a home page, the utility bar, or an Experience site page.
That is the reason this whole thing is possible without a developer. The list you want does not exist as a component anyone shipped, so you build the one you want and place it like any other.
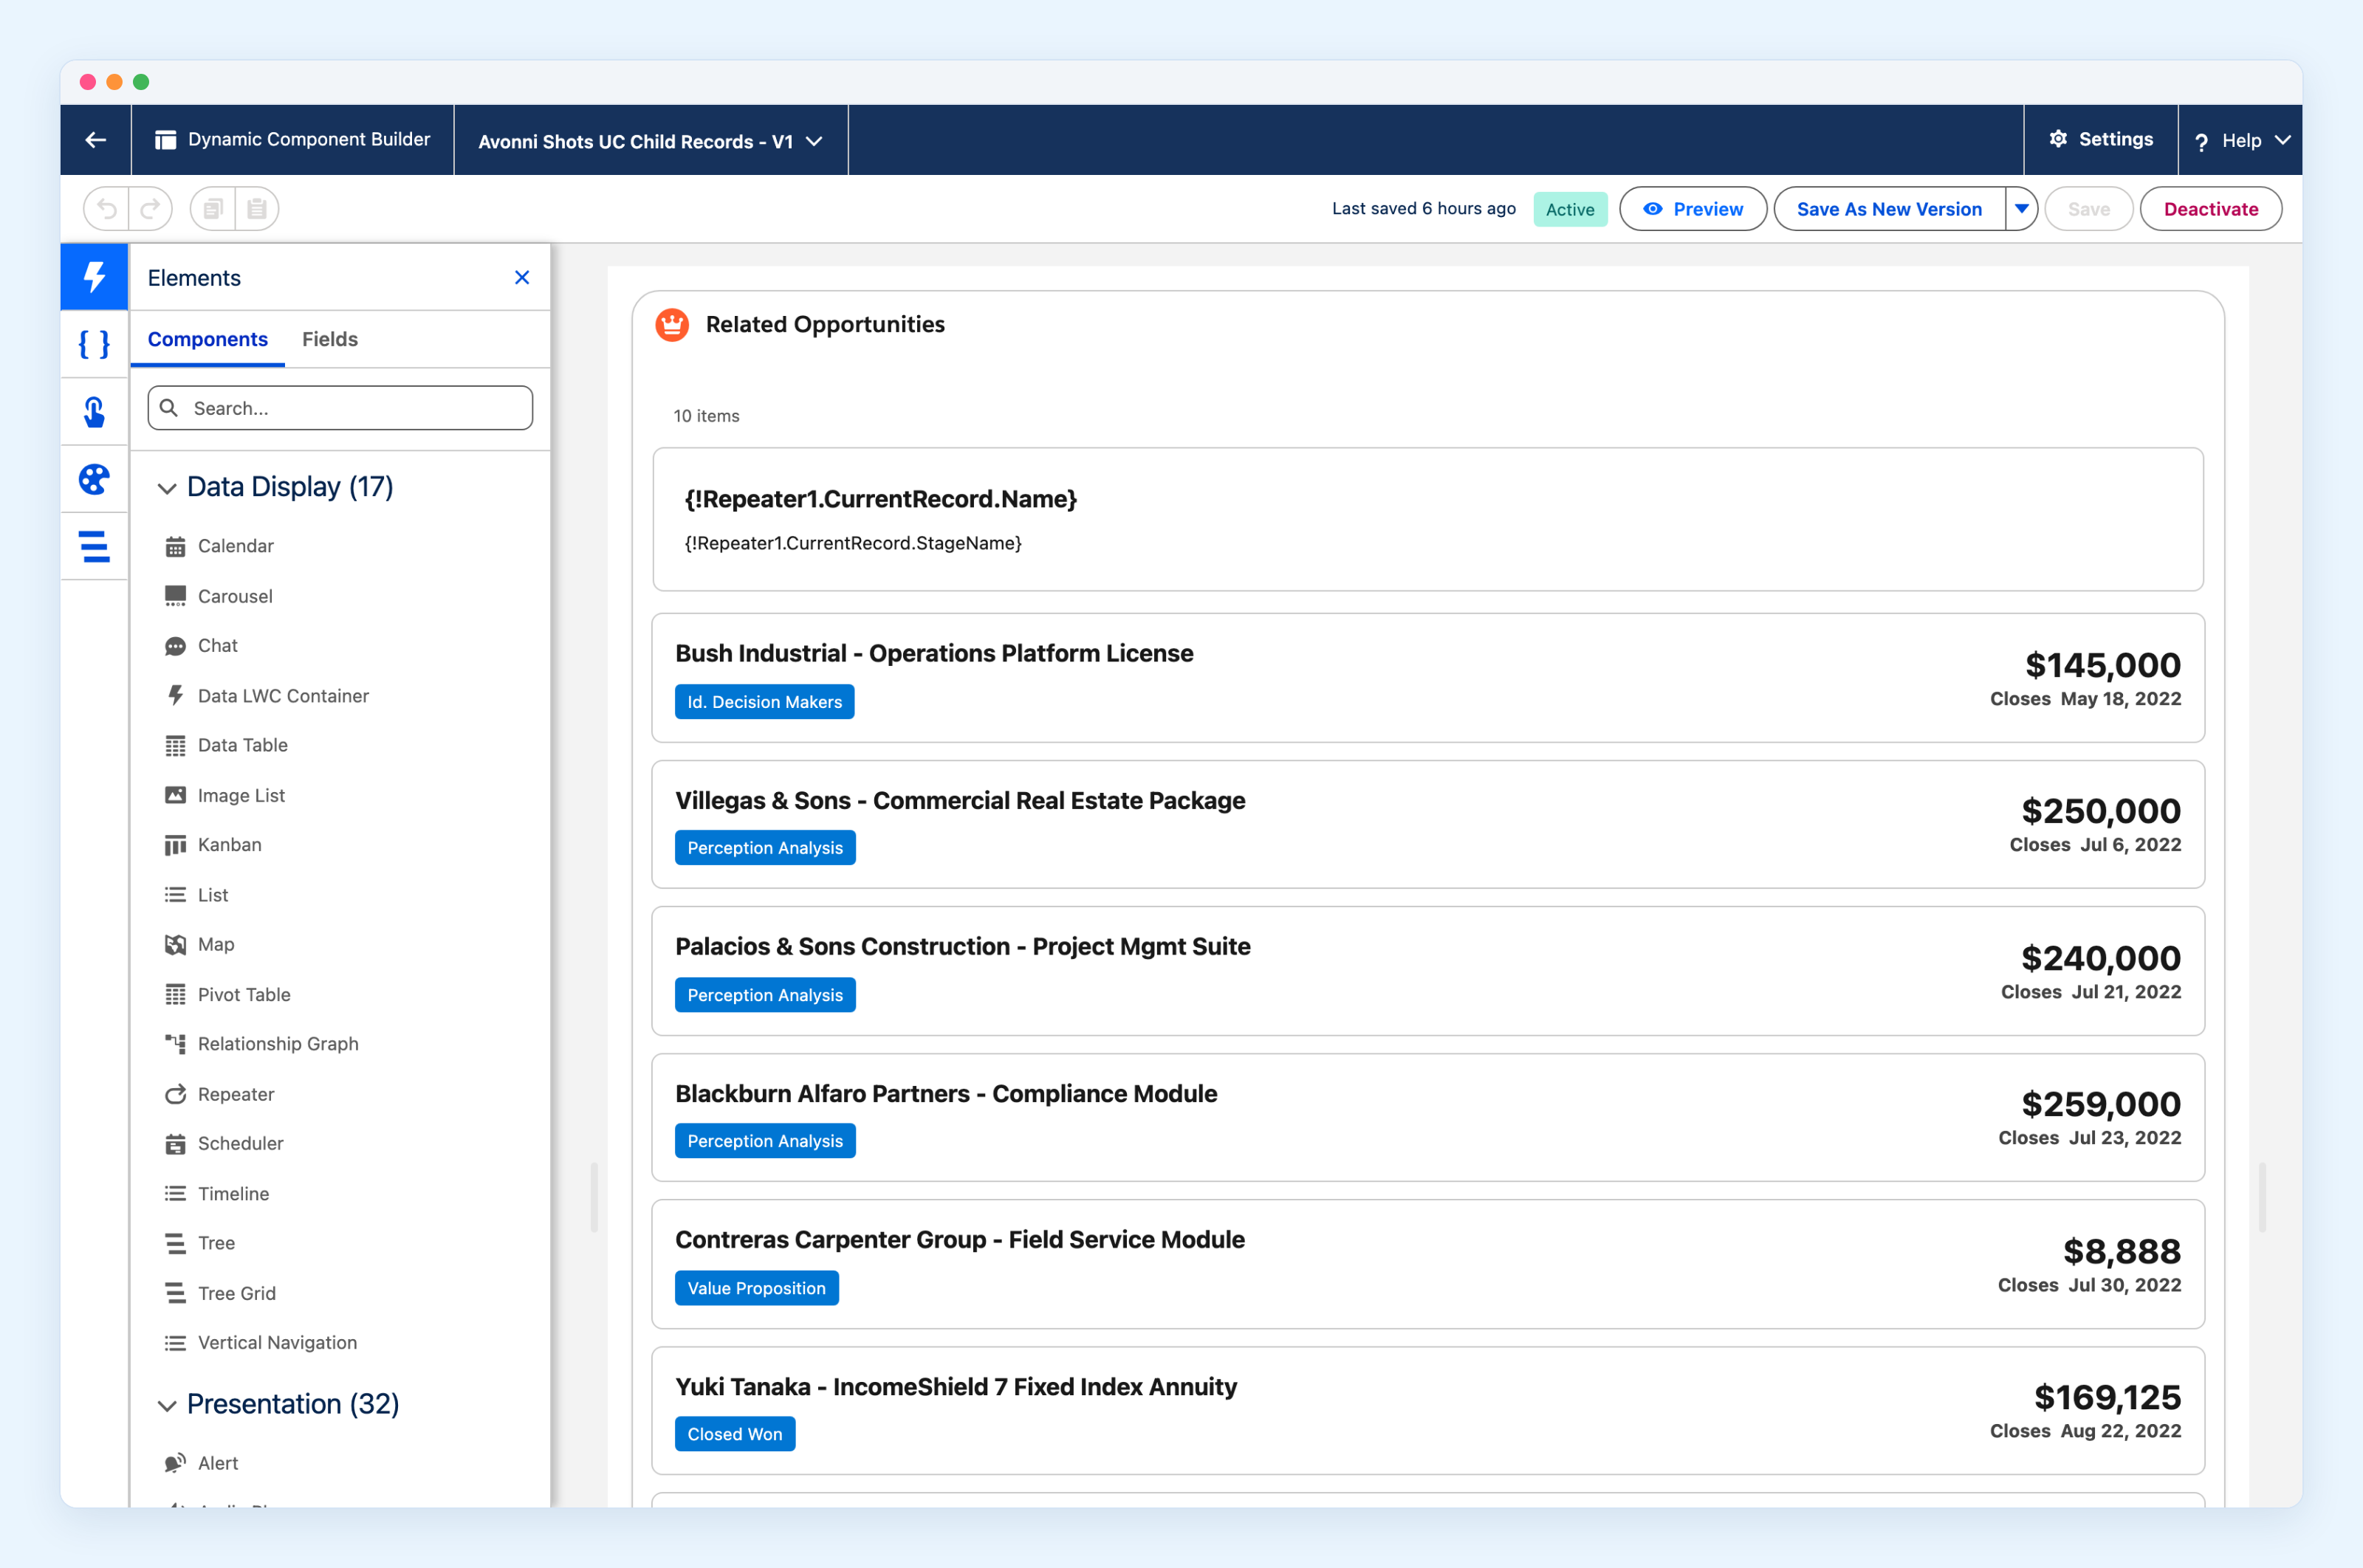
Create one and open it in the Component Builder. The left panel, Elements, is your catalogue: every component you can drag onto the canvas, grouped into Data Display, Presentation and the rest.
2. Drop in a Card, then a Repeater
Drag a Card onto the canvas and give it a title. This is just the frame.
Inside the Card, drag a Repeater. You will find it in Data Display, between Relationship Graph and Scheduler.
The Repeater is the component that means "one of these per record". You hand it a set of records and you design a single item, and it draws that item once for every record it was given. It is the general answer to any list you would otherwise have to build by hand: a related list, a directory, a grid of cards, a feed. It can lay those items out in columns, paginate them, and give the user a search box and filters over them, and none of that changes how you design the item.
Which is the mental switch worth making now: build one row, not a list. The Repeater turns your one row into as many as there are records, so every decision you make from here is about a single item.
If you are already thinking that a Data Table or a List would have done this, you are not wrong and there is a section on it after the build.
3. Tell the Repeater to use a query
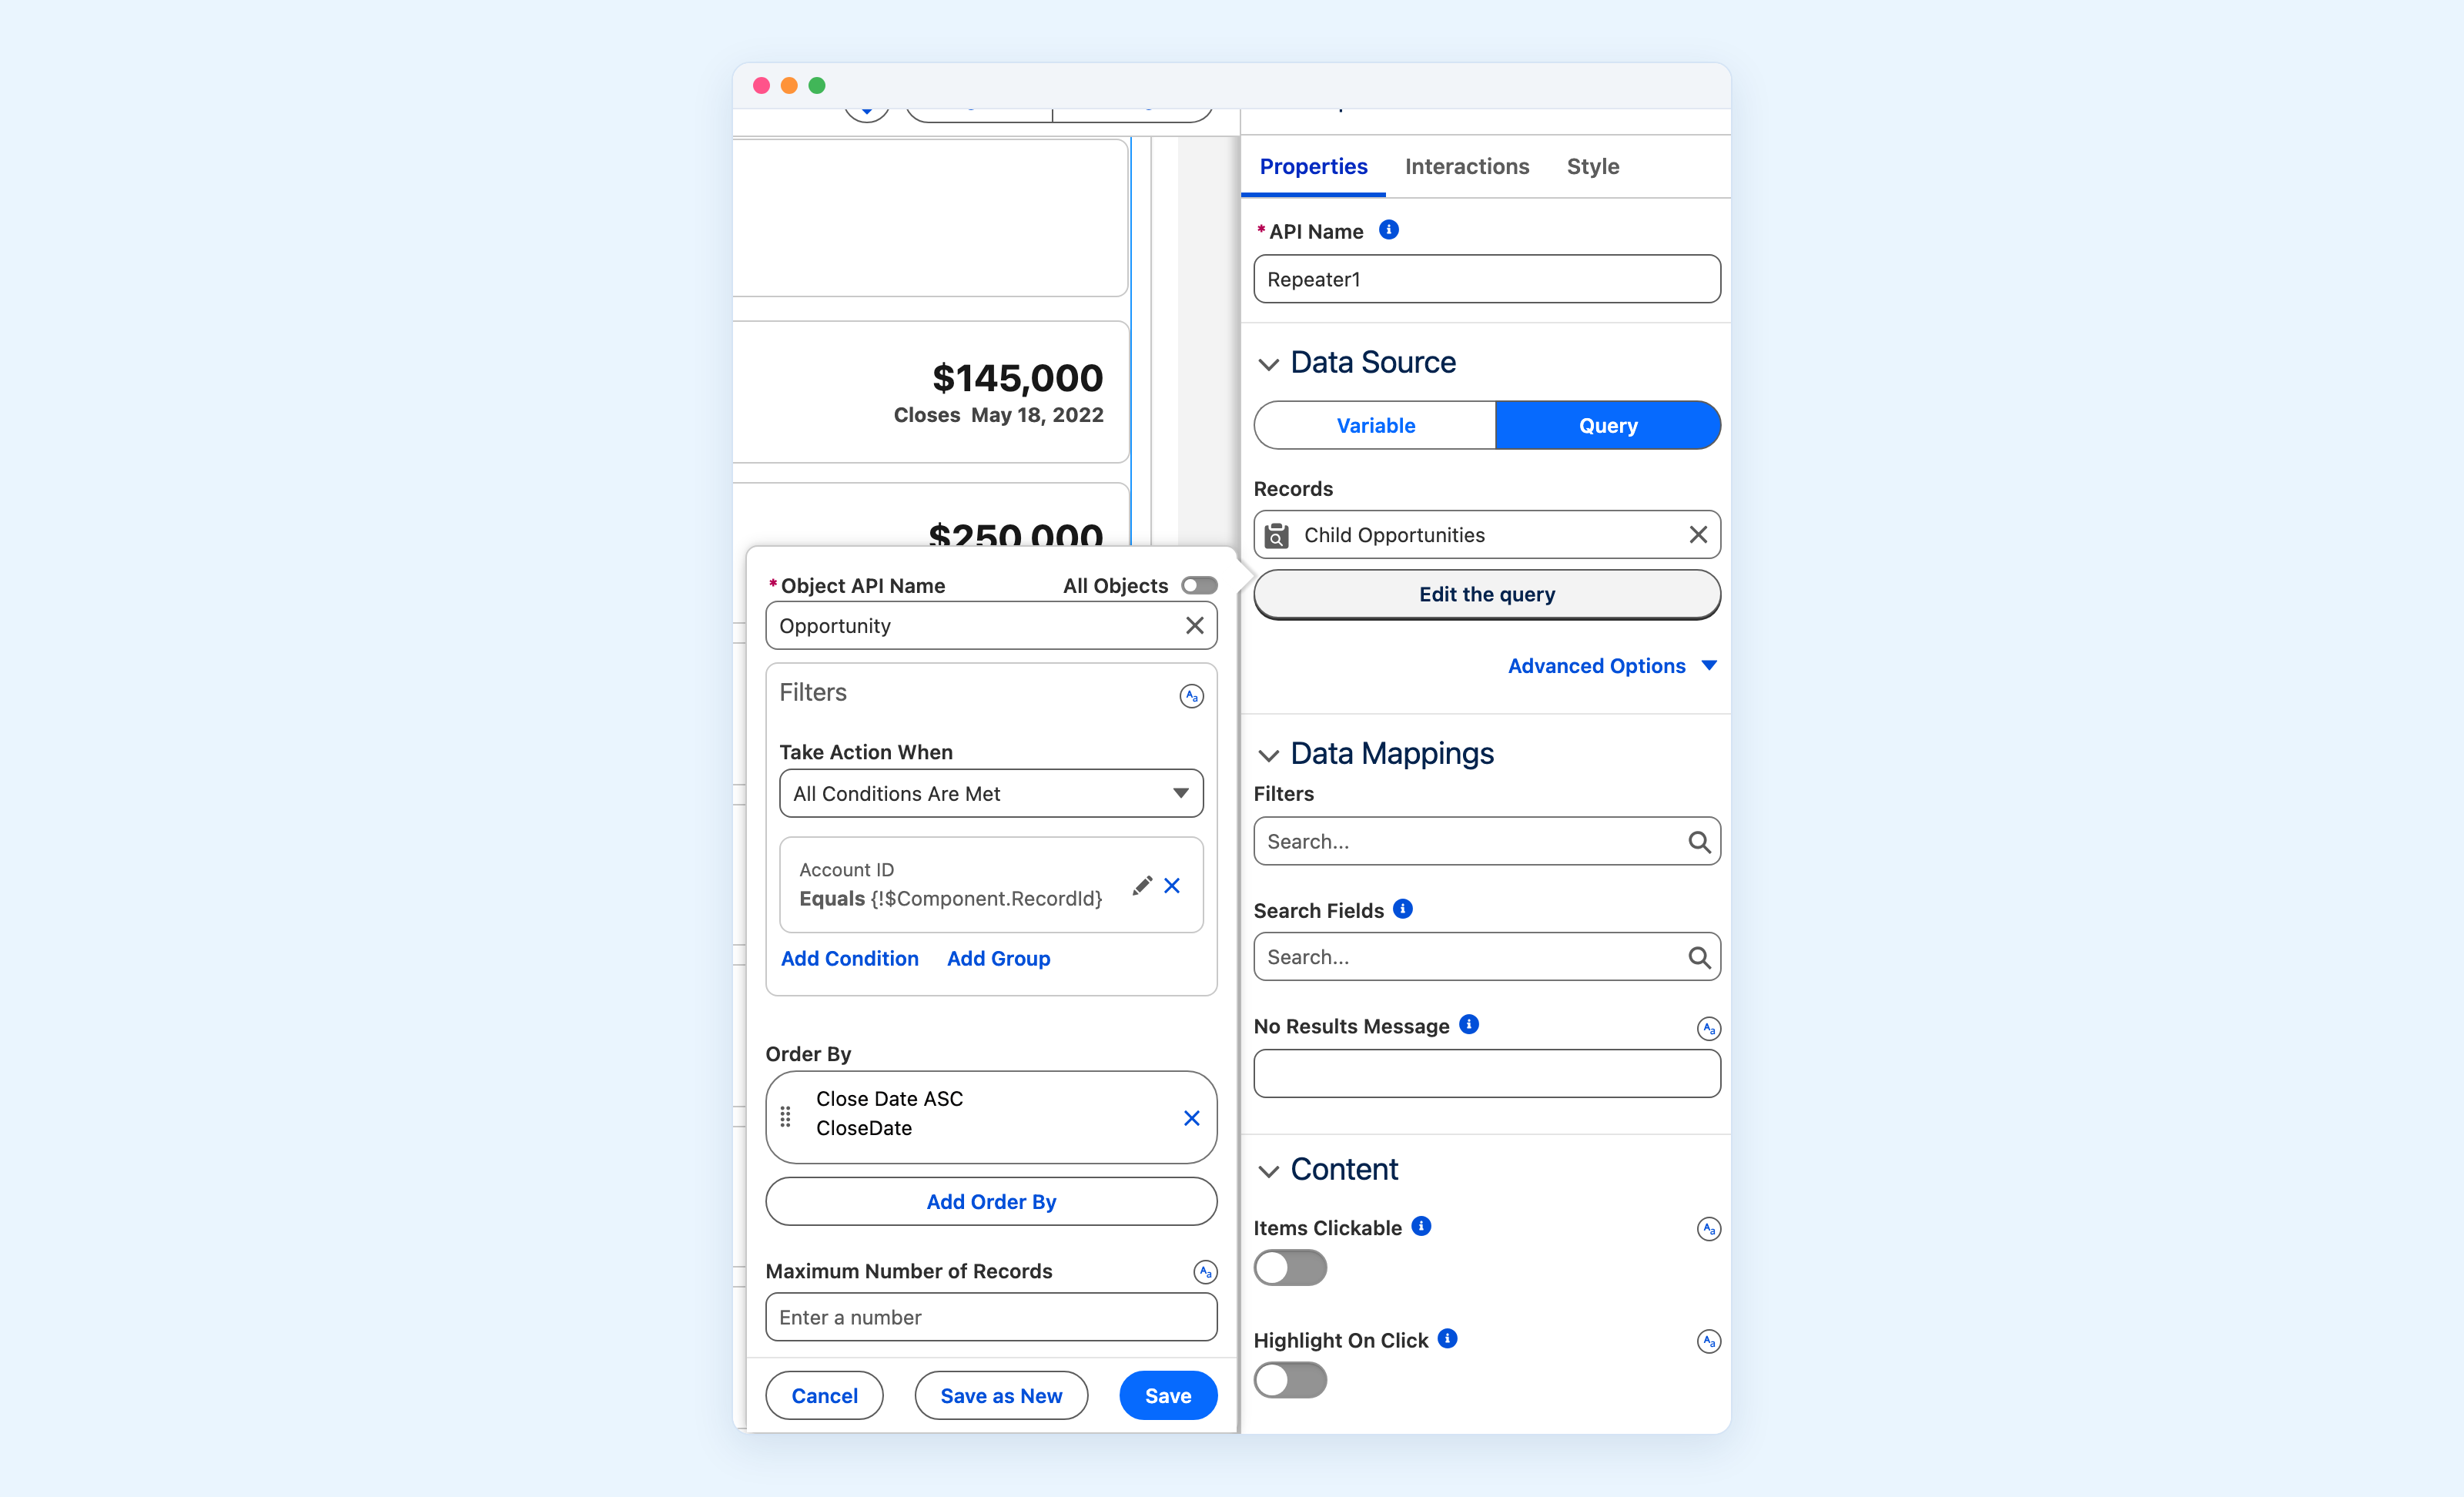
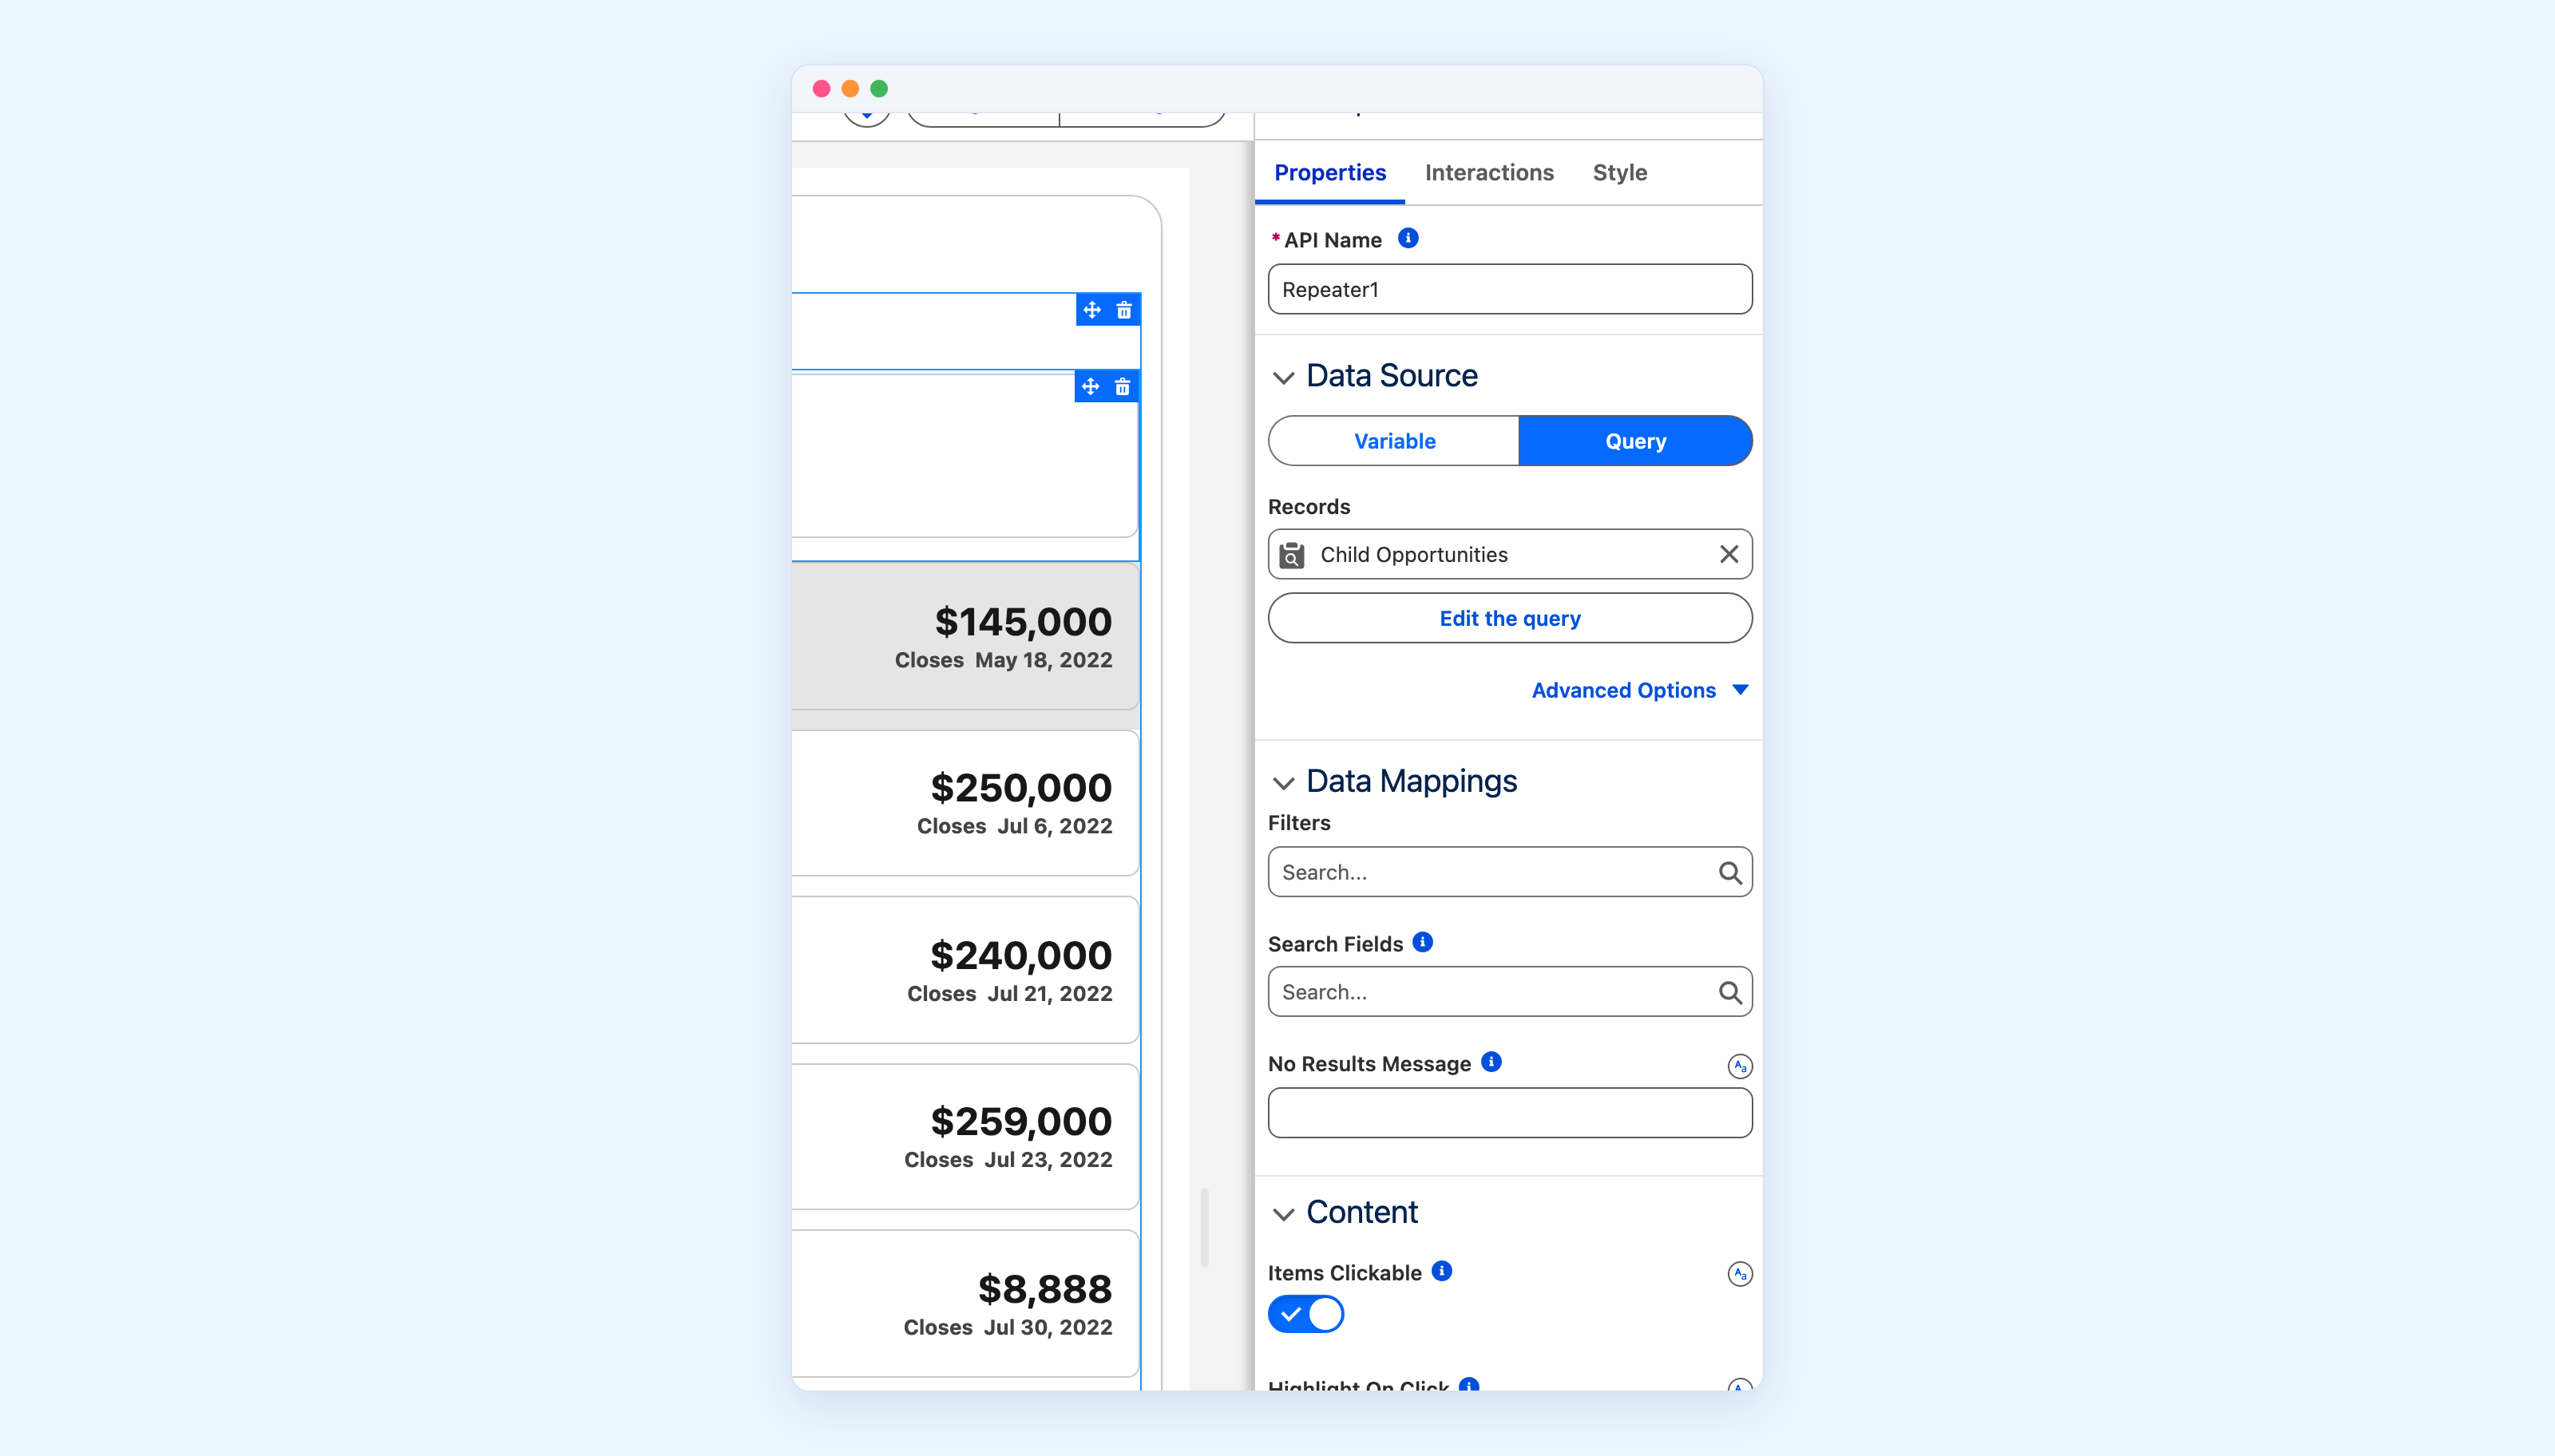
Select the Repeater. Its properties open on the right. Under Data Source, you get a choice between Variable and Query. Choose Query, then click Edit the query.
4. Filter the children by the record you are on
In the query editor, set Object API Name to Opportunity. That is the child object you want to list.
Then, under Filters, leave Take Action When on All Conditions Are Met and use Add Condition to create exactly one condition:
Account ID Equals {!$Component.RecordId}
{!$Component.RecordId} means the record of the page the component is sitting on. Account ID is the opportunity's lookup back to its parent. Put together, the condition reads: give me the opportunities whose account is the account I am looking at.
That one line is what scopes the entire list. You never pass the record id in from anywhere. On a record page it is already there.
While you are in this editor, add an Order By. In the screenshot it is Close Date ASC, which is why the nearest deal sits on top of the finished list. There is also a Maximum Number of Records if you want to cap it.
Save the query. Back in the Repeater, the Records field now shows it by name.
5. Build the item
This is the step that decides whether the result looks designed or looks like a form. Four stacked label and value lines will work, and it will read as a wall of text. Give the row a shape instead.
Drag a Columns Container into the Repeater and give it two columns. On the left, what the deal is. On the right, what it is worth.
- Left column: the opportunity name and its stage, both Formatted Value components. Formatted Value is what renders the stage as a badge instead of the word "Negotiation/Review" in grey text.
- Right column: a single Metric for the amount. Metric gives the number its size, and its secondary value puts the close date directly underneath, so one component carries the two things a rep actually scans for.
Three details do most of the polishing, and skipping them is what makes a component look homemade. Two of them live on the Style tab, which every component has next to Properties and Interactions.
Give the right-hand column a fixed width rather than letting it size to its content. Sized to content, each row's number starts somewhere different and the column wanders down the page.
Select the Metric and open its Style tab. Alignment is one of the sections there; set it to the end so the amounts share a right edge and can be compared by eye without reading them.
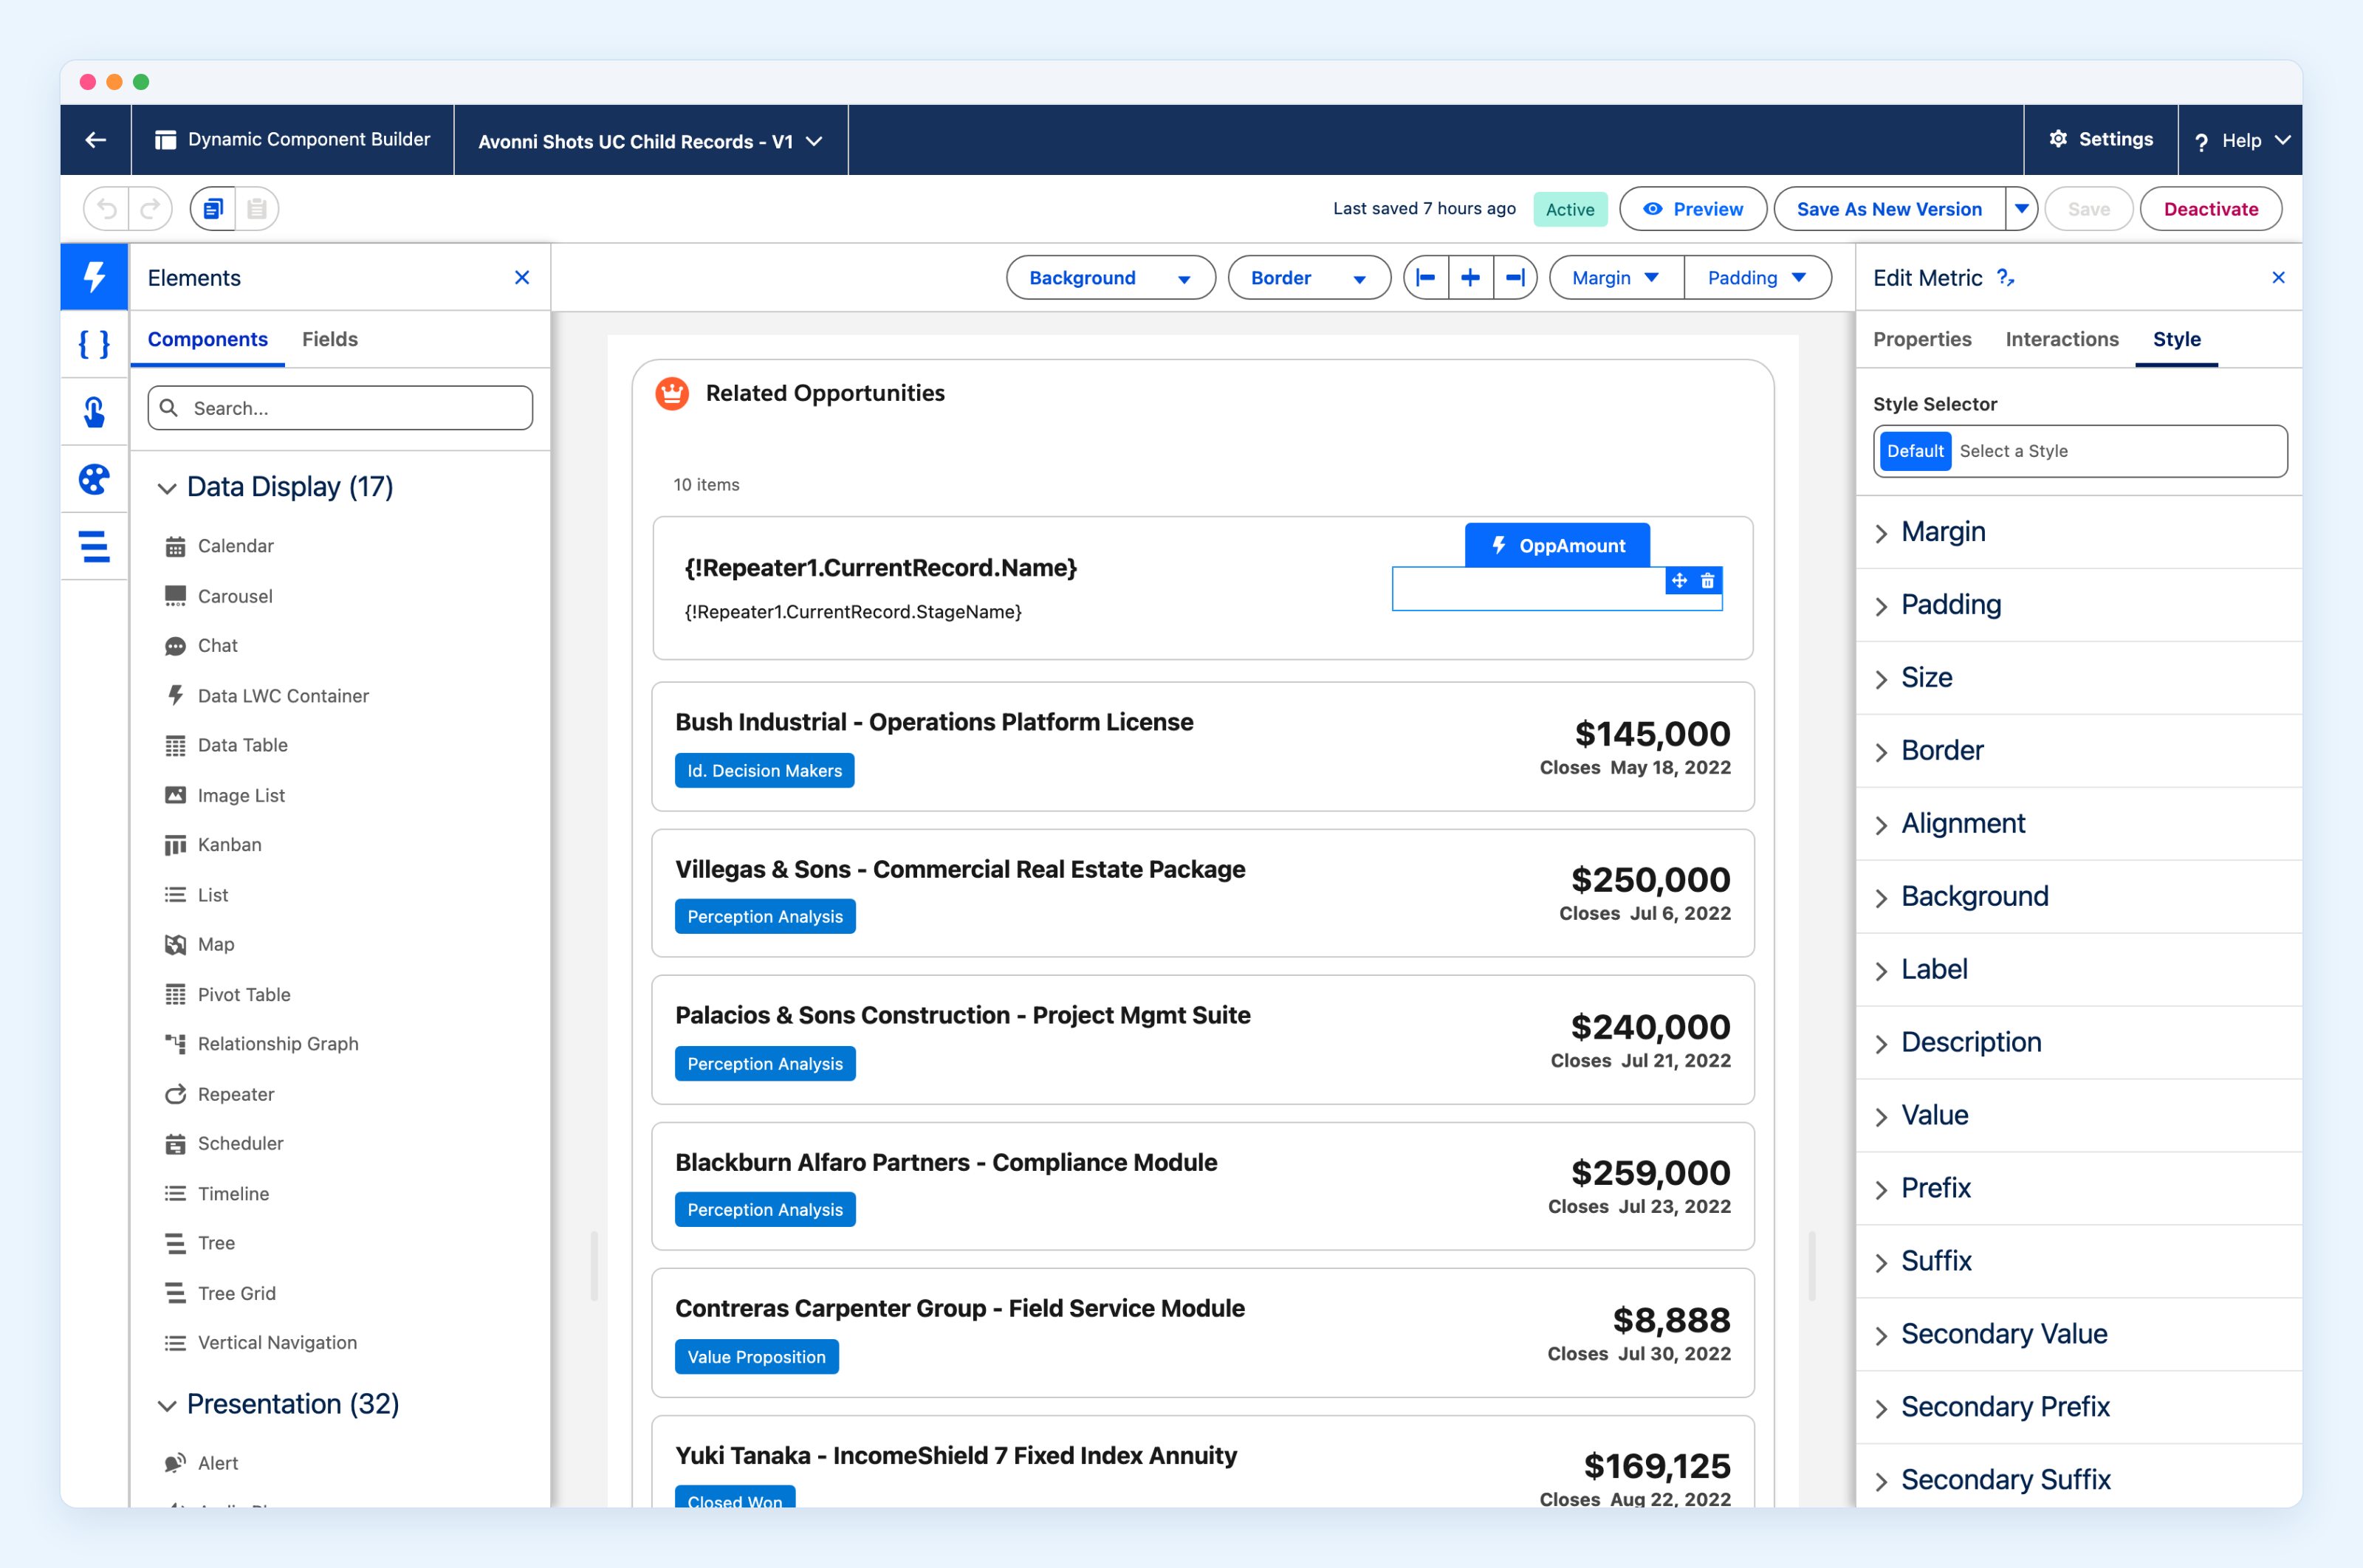
Margin is a section on the same tab. Give each item a small bottom margin, or the rows touch and the whole thing collapses back into a table.
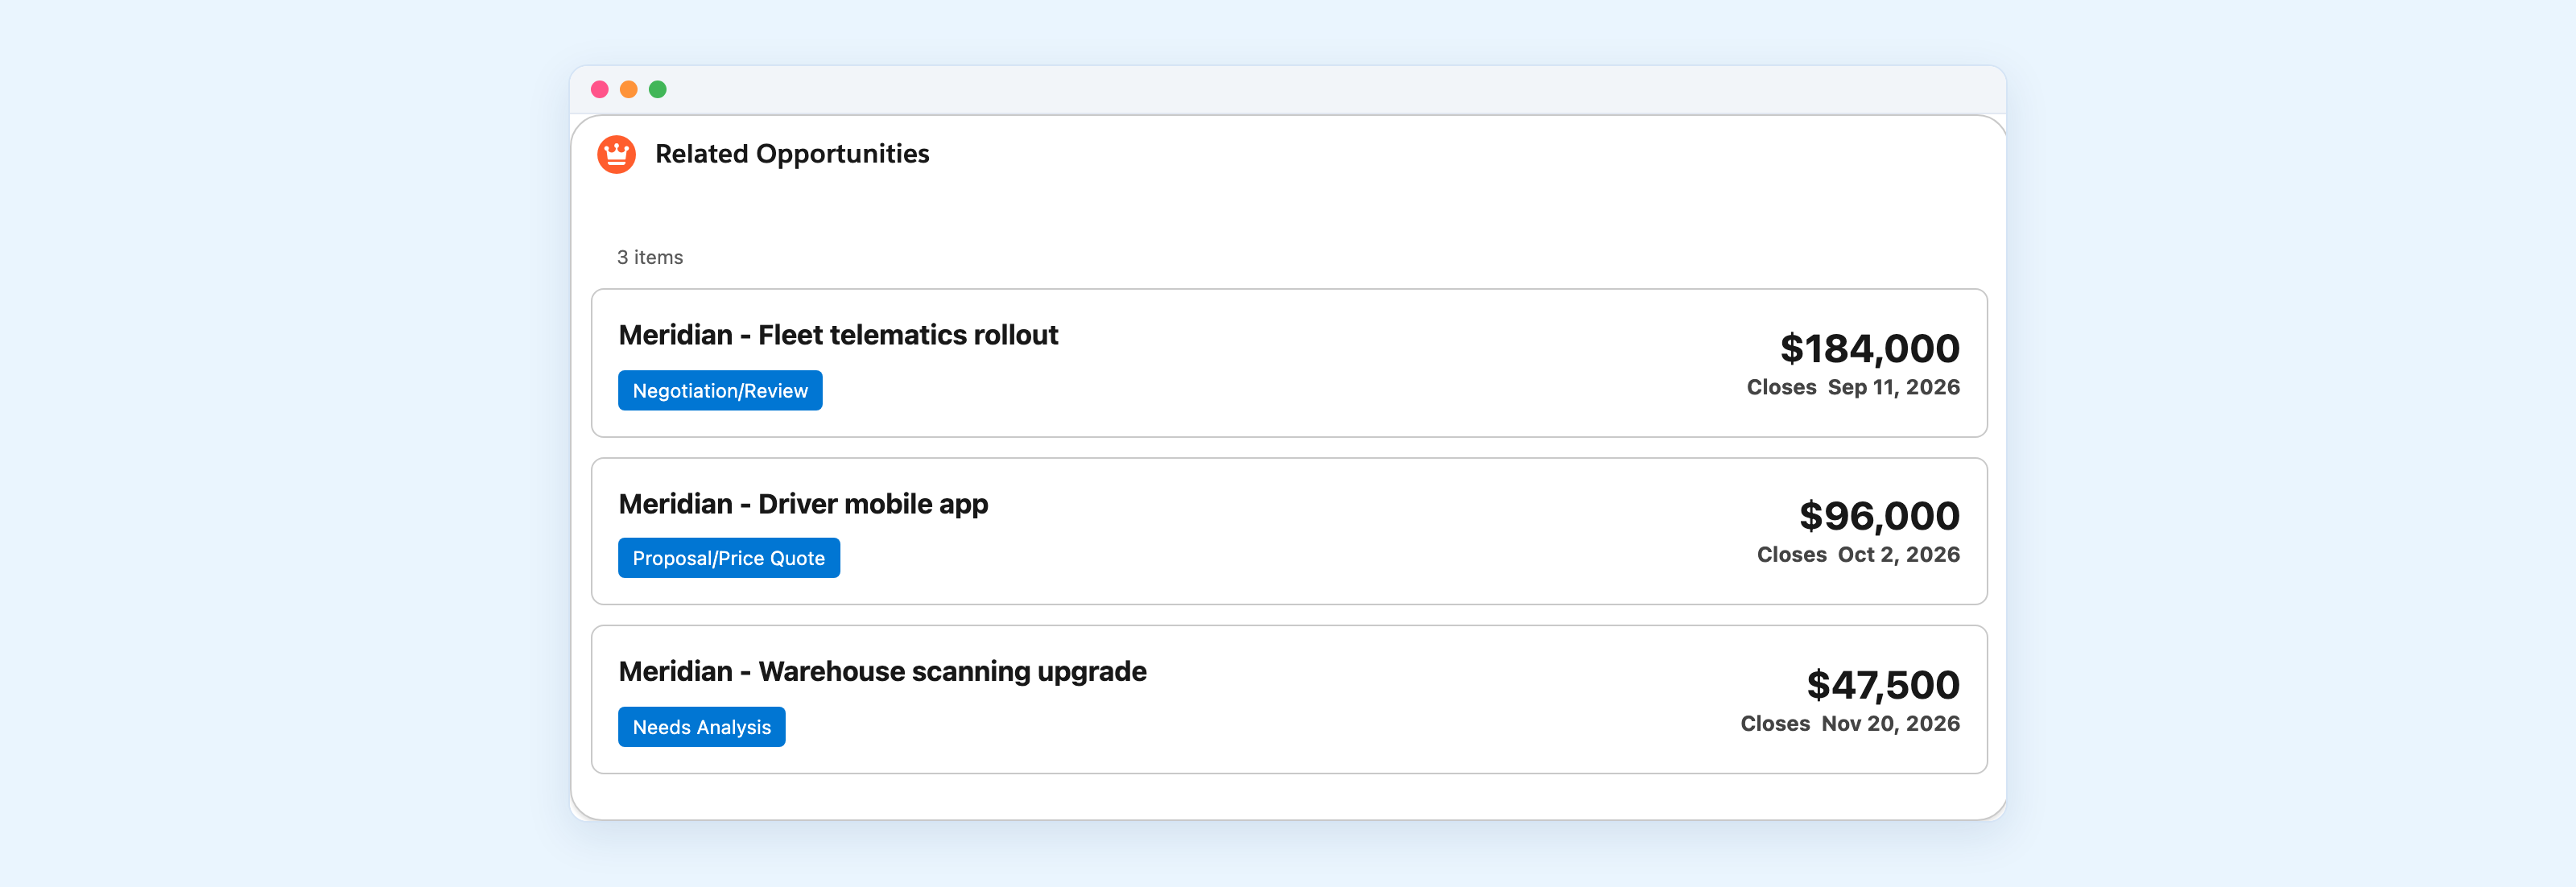
Whatever you put in there, each field points at the current record of the Repeater rather than at the page. You pick these from the expression menu under the Repeater's own name, and what you end up with looks like this:
{!Repeater1.CurrentRecord.StageName}
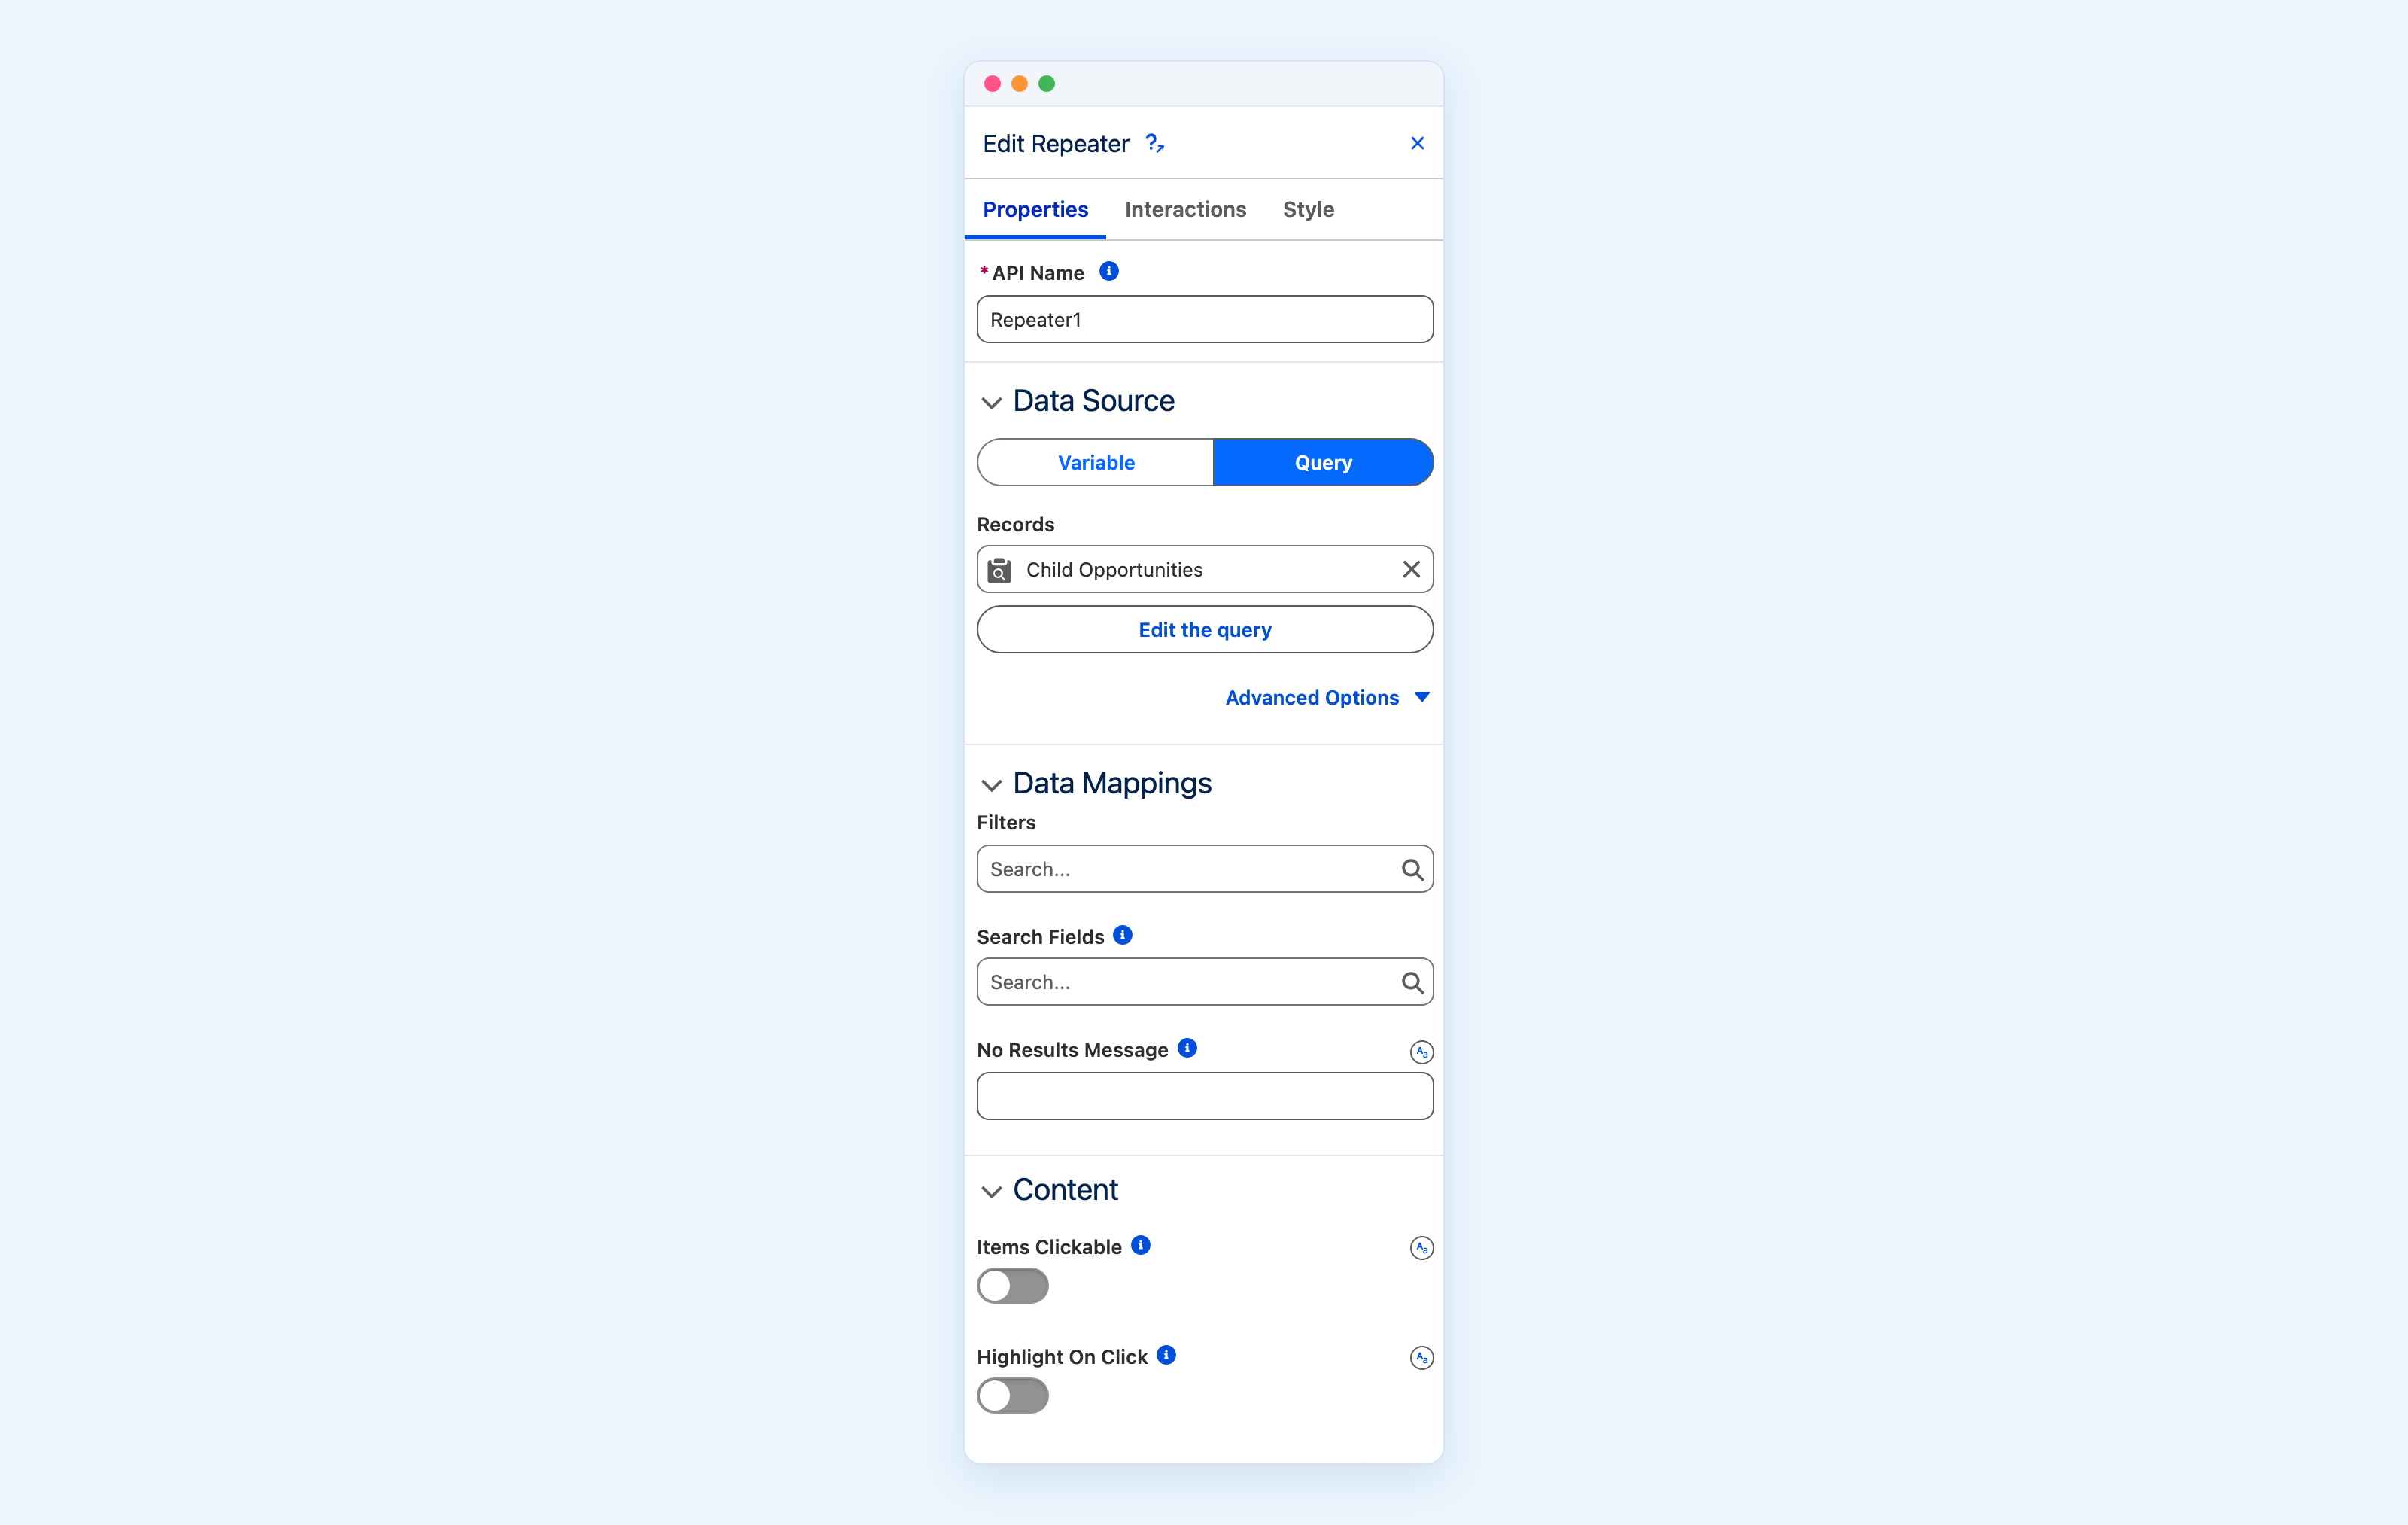
Read it as: this repeated record, not the page's record. Repeater1 is the Repeater's API Name, which you can see and change at the top of its properties panel.
One last thing on the Repeater itself, and it matters more than it looks. Under Content, turn on Items Clickable, then use the Interactions tab to send the click to a Navigate interaction pointing at the record.
Skip this and you have quietly taken something away. Those blue links in the standard related list are ugly, but they are also how people open the record, and a prettier list that goes nowhere is a downgrade. While you are weighing that: the standard list also gives you row actions and respects field level security on its own. Build the custom one because the layout earns it, not because the standard one is worthless.
One thing you do not have to worry about, despite what you may read: you are not required to declare the fields you display. The Repeater works out what to fetch from the expressions you actually wrote, so adding a field to the item is enough. Tested on this version by declaring only Id and Name and then displaying three other fields, which all came back.
If you ever do need a field the Repeater cannot see, Advanced Options on the Repeater has an Additional fields property for exactly that.
6. Save, activate, and place it
Save the component and activate the version. Then add it to your account record page in the Lightning App Builder, the same way you add any other component. It picks up the record context from the page, which is what makes step 4 work.
If you see an expression printed on your page
There is one wrong turn that catches almost everyone, and it does not look like a mistake, so it is worth knowing on sight.
If you skip the query and instead try to reach the opportunity field directly from the page record, the page renders the expression back at you as plain text, something like {!$Component.Record.Amount}, sitting in the middle of your layout. No error, no warning.
That means the field could not be resolved. In an expression, Record is the record of the page you are on and nothing else. On an account page, Record is the account, and opportunity fields are not on the account, so there is nothing to resolve. There is no related list hidden behind Record that another dot will reach.
The fix is the six steps above: the children have to be fetched by a query before you can display them.
Why the Repeater and not a Data Table or a List
Fair question, and for a lot of related lists the honest answer is that you should use one of those instead. Both read the same query. Here is what each one gives you for the same three records.
A Data Table gives you columns, and columns are good at comparison. Sortable headers, right-aligned currency, a badge cell type, inline editing, grouping and totals if you want them. You configure four columns and you are done.

It is a table, though. Every row is the same shape, the long names truncate, and nothing on a row is more important than anything else on it.
A List gives you an item instead of a row: a title, a subtitle, an avatar, then your fields underneath. You map record fields into that shape and it handles the rest, including drag-to-reorder and a checklist mode if you need them.
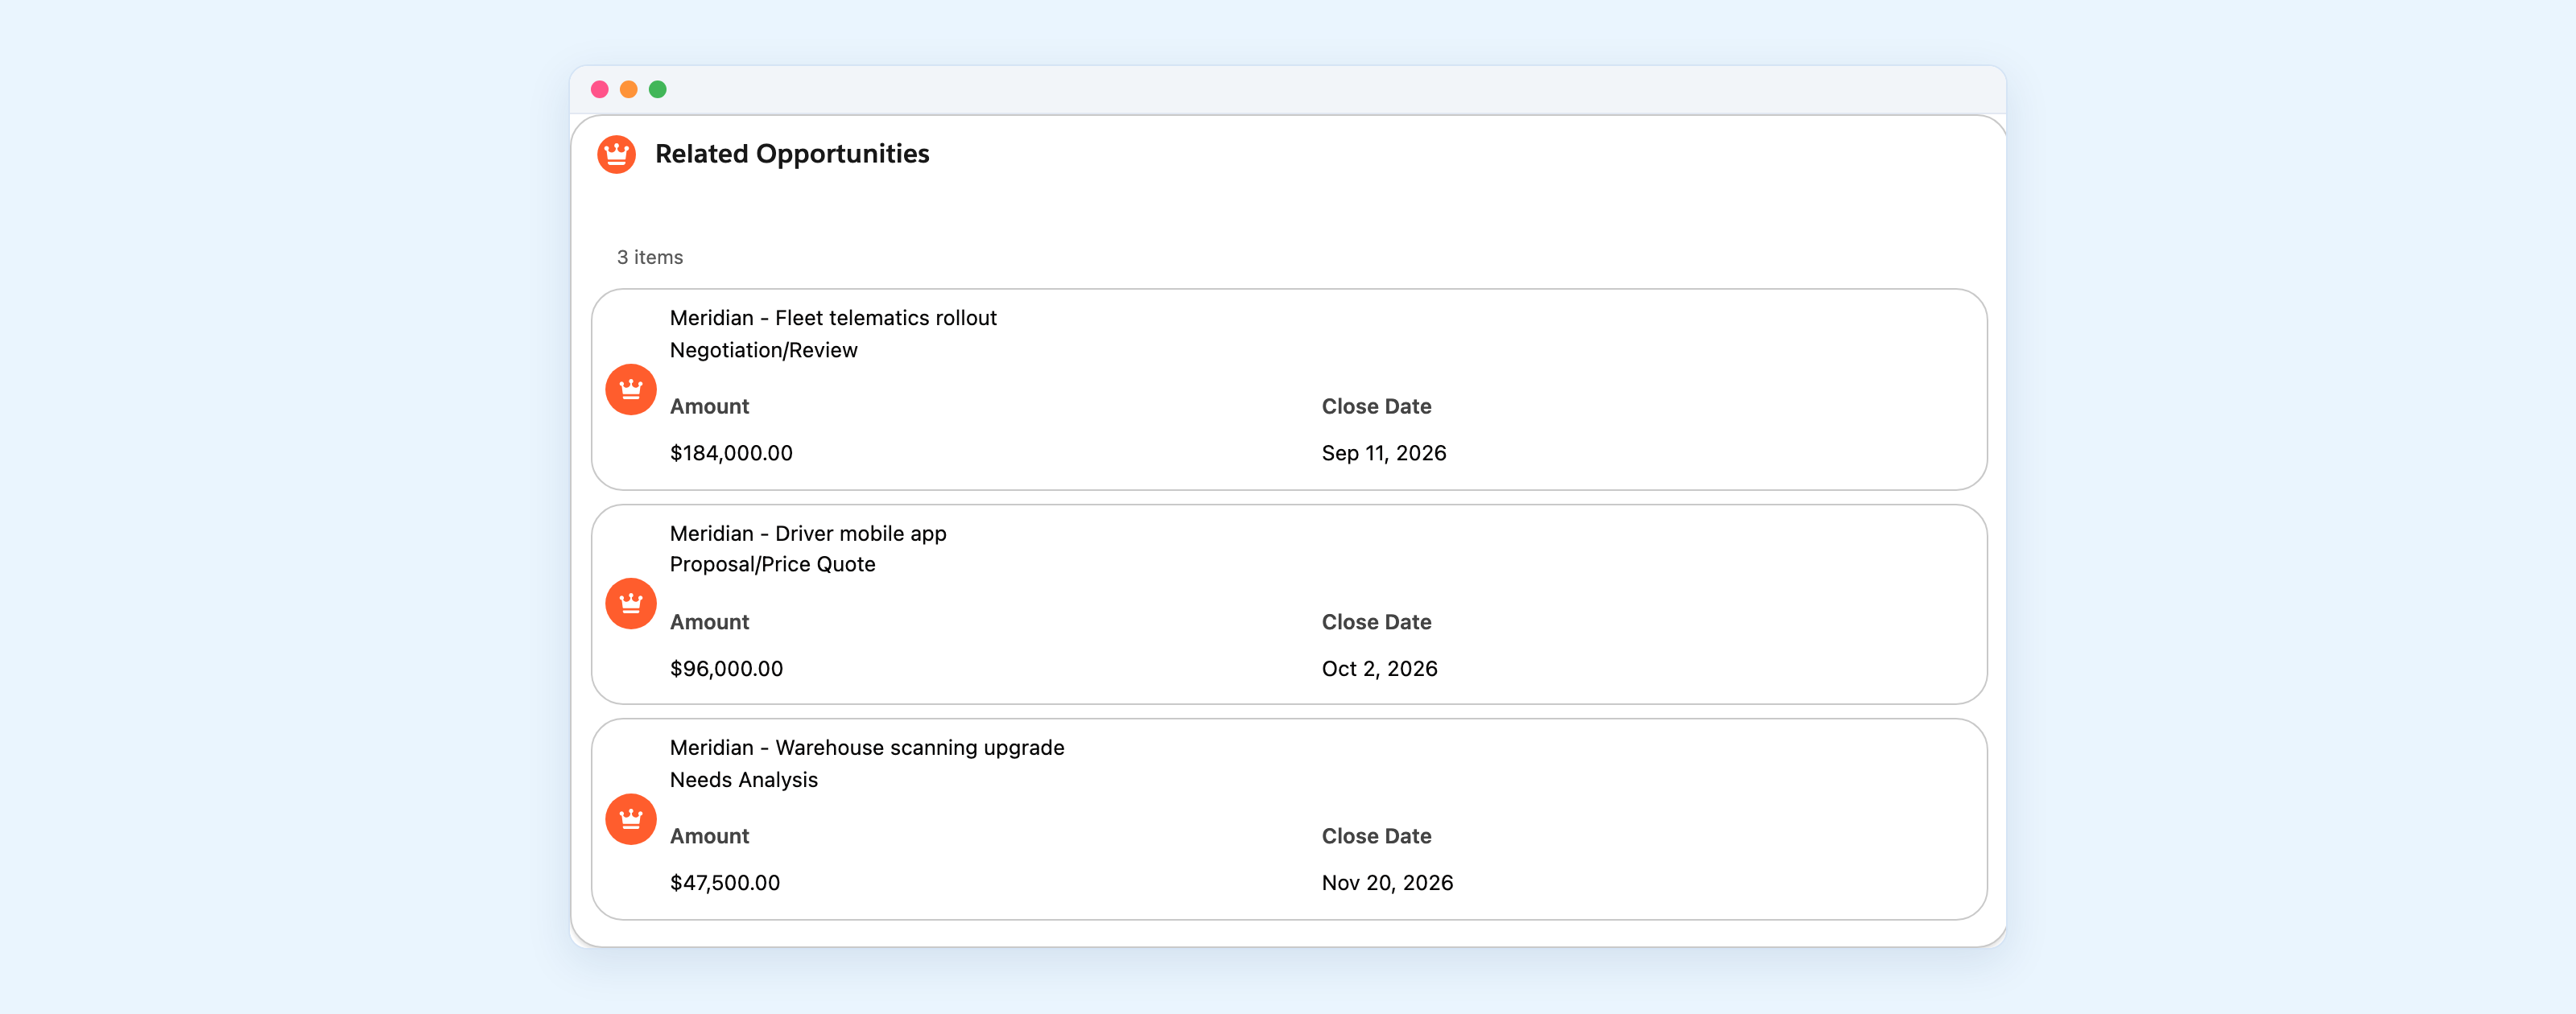
But the shape is the component's, not yours. The stage arrives as a subtitle rather than a badge, and the amount sits in a labelled field with exactly as much weight as the close date next to it.
So the rule is simple. If a table's shape fits, use the Data Table. If the item is a title with some fields under it, use the List, it is less work and you get features for free. Reach for the Repeater when the layout of the item is the point, because it is the only one of the three that hands you an empty item and lets you compose it from any components you like.
Here, the layout is the point. The whole argument of this article is that the amount should be large, the stage should be a badge and the date should be secondary, and none of the three is a thing the other two can be told to do.
The same move, three more times
Nothing above is specific to opportunities. Change the object in the query and change what the item shows, and the same six steps give you a different list. Two more built on the same account page, from the same recipe:
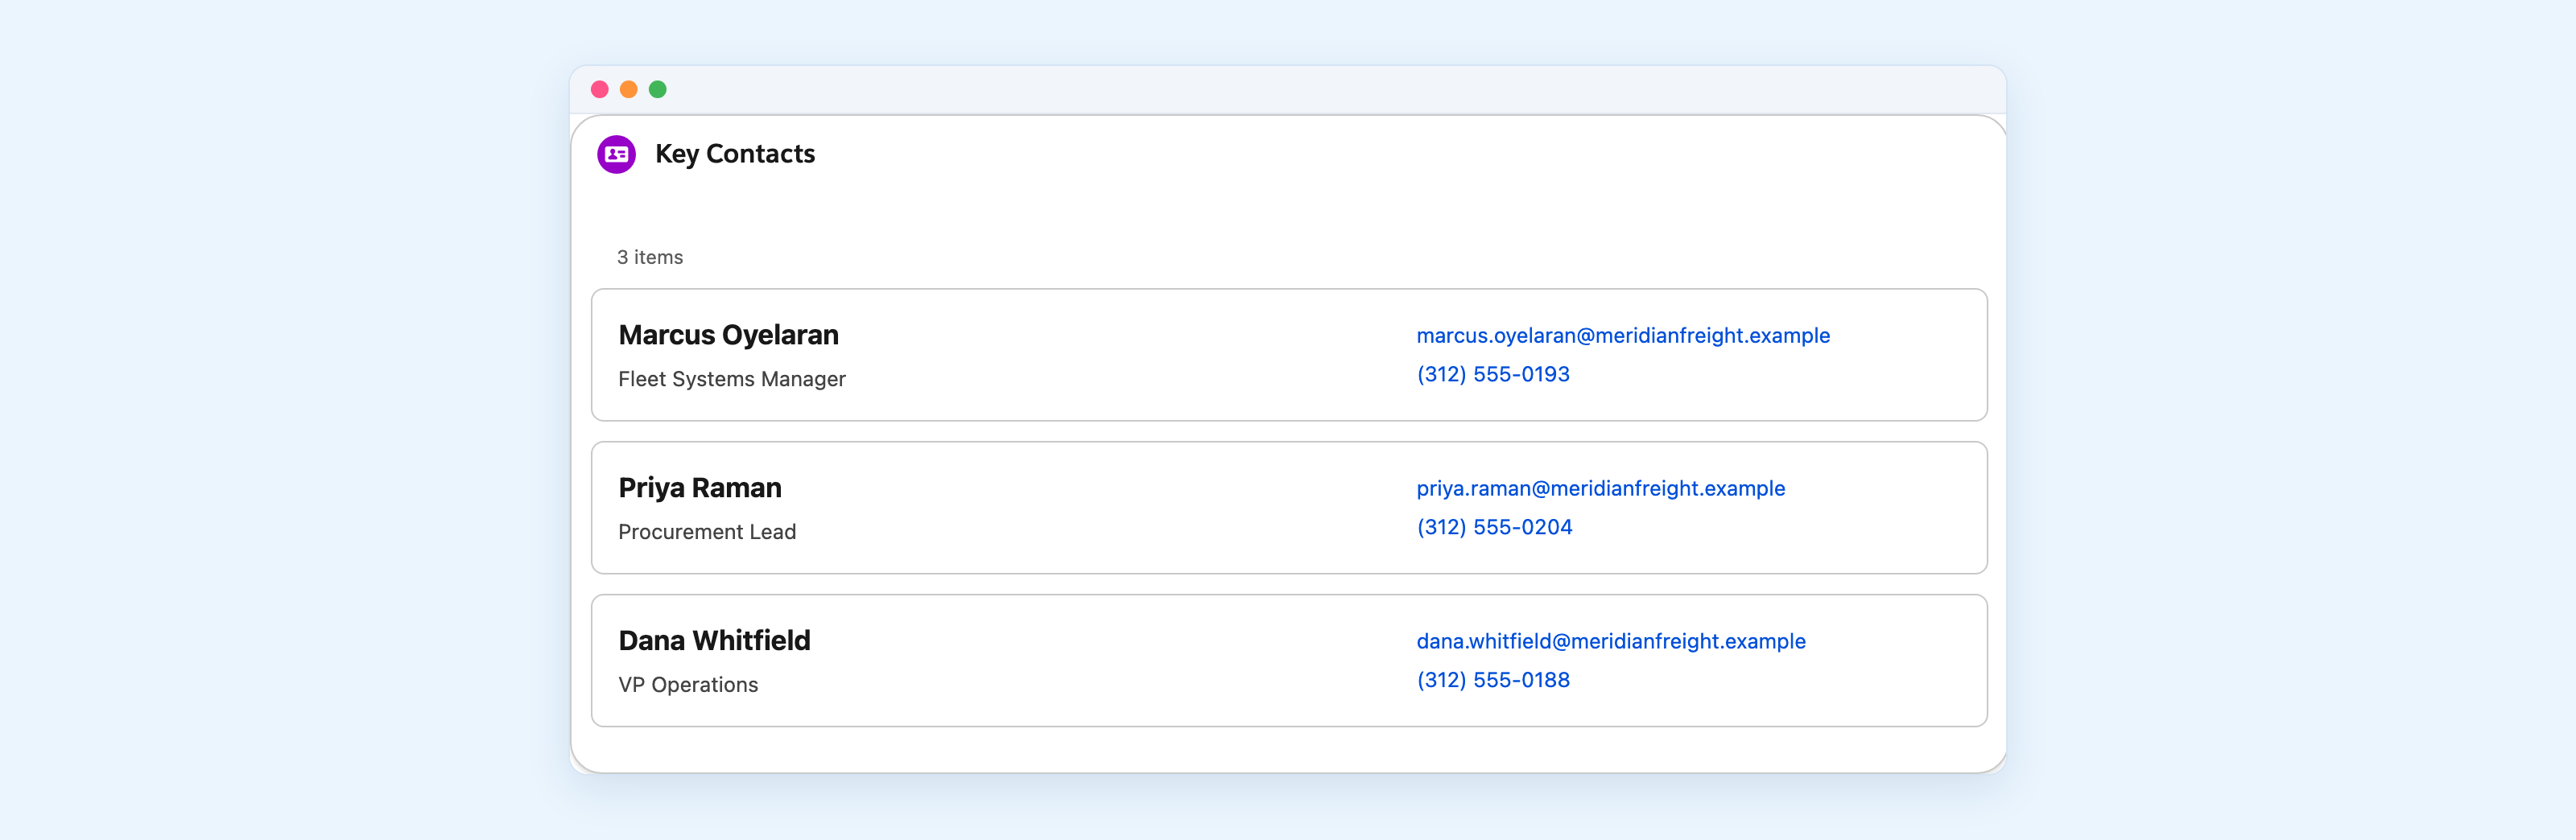
Contacts, with the job title under the name and the email and phone on the right, so someone preparing for a call can see who to talk to and reach them without opening anything. Query the Contact object, filter on Account ID, and the item is four fields.
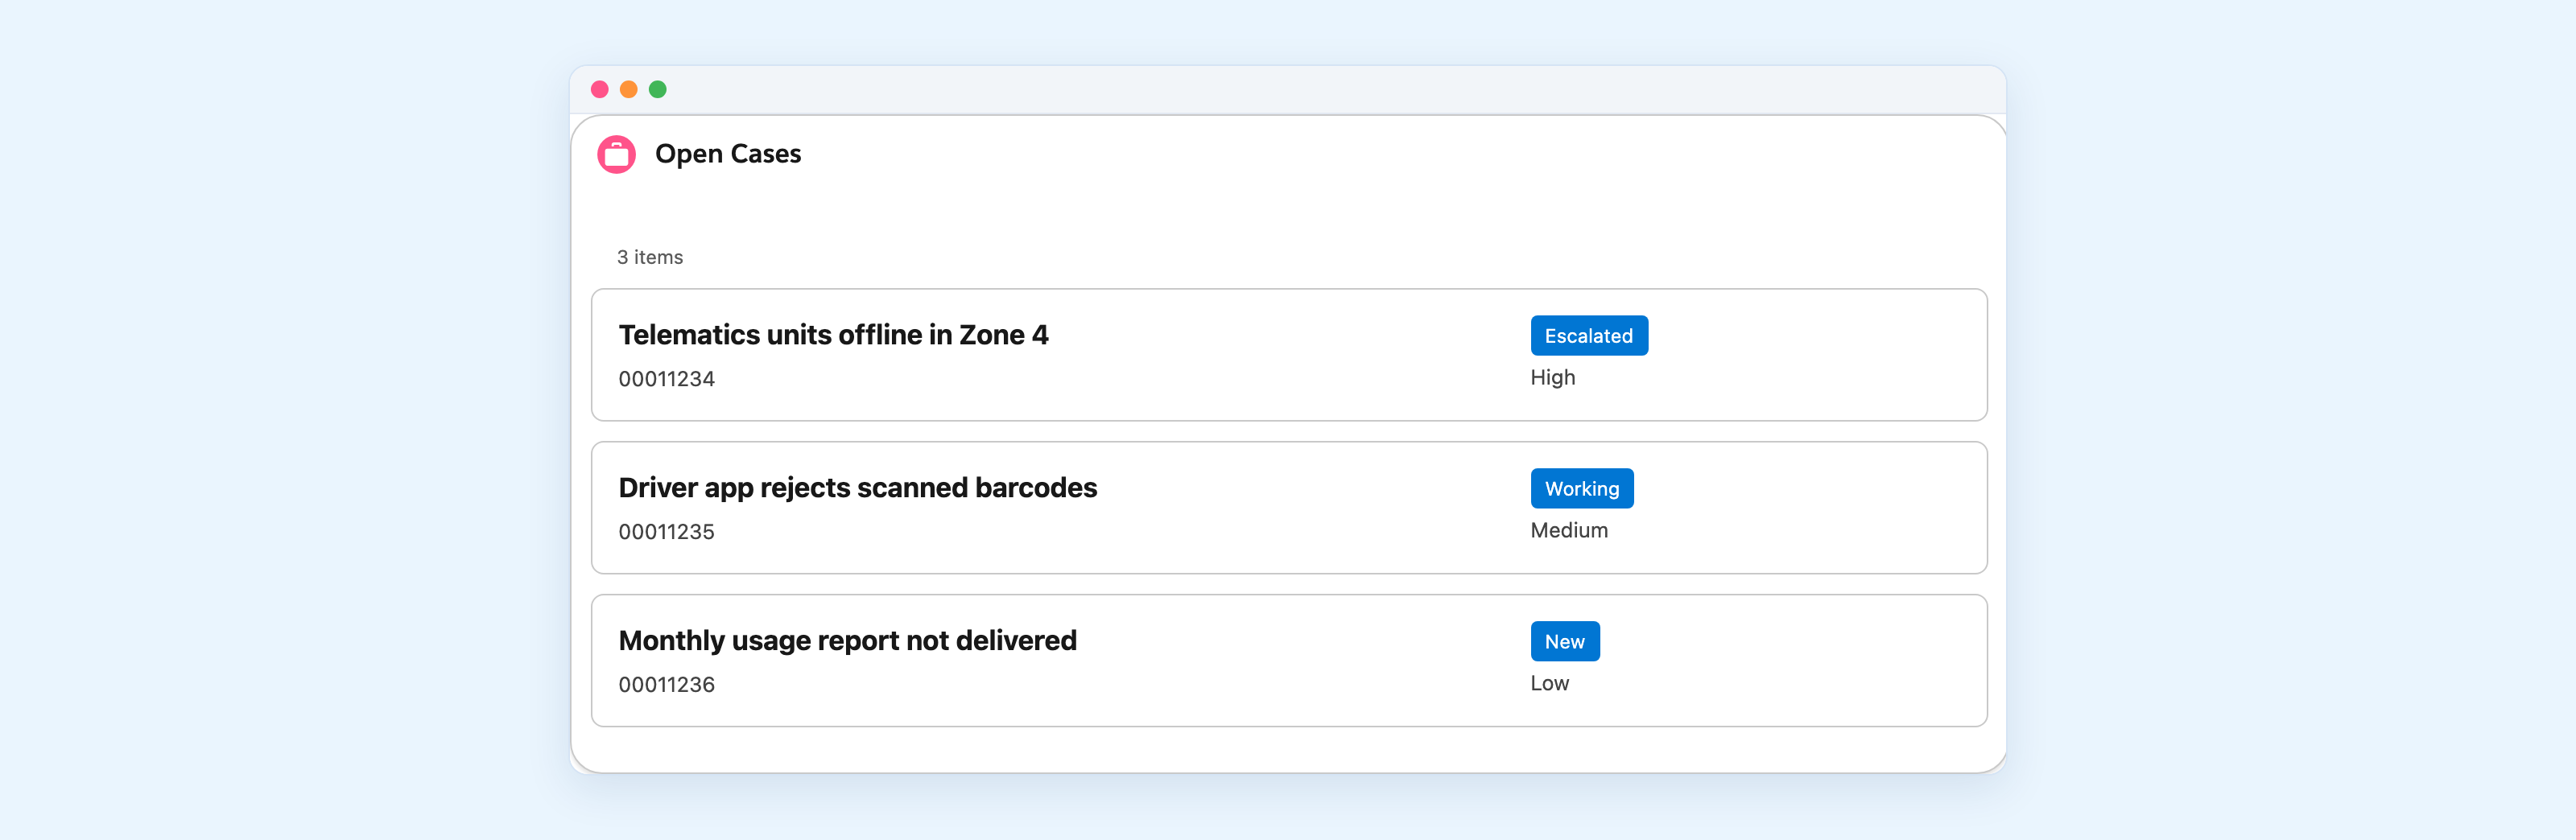
Cases, where the status badge does the work the stage badge did for opportunities. On a support-heavy account this is the panel people actually want above the fold, and the standard related list buries it.
A few more that use the identical pattern:
- Contracts on an account, with the end date as the metric, so renewals surface before they surprise anyone.
- Assets on a contact, so a support agent sees what the customer owns before asking.
- A custom parent listing its custom children, which is where we first watched someone hit the wall in the first place.
- Any object with a lookup to the record you are on. If the relationship exists, the query can follow it.
The recipe never changes: fetch the children with a query filtered on the record you are on, repeat over the result, address the fields through the current record. What changes is the object and what you decide is worth showing.
That last part is the real work, and it is not technical.
Where to start
Do not start with the component. Start by opening the record page your team uses most and watching what they actually look for on it. There is usually one related list that everybody squints at, and it is almost never the one at the top.
Then build that one. The six steps above are the whole recipe.
Everything in these screenshots is running on Avonni Experience Components 1.26.0.






%20(Vignette%20YouTube)%20(81).png)