Salesforce Flow Screen Components: The Complete Guide [2026]
Everything you need to know about Salesforce flow screen components — what's native, where the gaps are, what Summer '26 and Winter '27 changed, and how to choose between community and commercial options.
If you've spent any time in Flow Builder, you've run into screen components. They're the building blocks of every Screen Flow — the inputs, displays, and layout elements that make up what your users actually see and interact with.
Most admins start with the native Salesforce components, which is the right call. They're free, supported, and for straightforward flows they get the job done. But at some point you hit a wall. A user needs to choose between options visually, not via dropdown. Someone wants a calendar instead of stacked date pickers. A stakeholder asks why users can't just change a stage or a date right in the table. That's when the native toolkit starts showing its limits.
This guide covers all of it: what Salesforce includes out of the box, where it stops, what Summer '26 and Winter '27 changed, and your realistic options when you need more.
What Are Flow Screen Components?
A Screen Flow is one of Salesforce's five flow types — and the only one that puts a UI in front of the user. Rather than running quietly in the background like a Record-Triggered Flow, it presents screens that walk users through a process step by step. Case creation wizards, onboarding forms, field inspection checklists, appointment booking flows.
Flow screen components are what those screens are made of. Each component is self-contained: a text input, a date picker, a record table, a file uploader. You drop them onto a screen in Flow Builder, configure their properties, connect them to flow variables, and they handle the rest.
Three types:
Input components — collect data from the user (text fields, picklists, lookups, file uploads)
Display components — show information without collecting anything (formatted text, images, record tables)
Layout components — organize the screen itself (sections, columns, tabs)
All three connect to flow variables, so data passes cleanly between screens and into your downstream automation logic.
Same process whether you're using a native component or one from a managed package. Six steps from blank screen to something wired and working.
Open or create a Screen element in Flow Builder. Click the + button between elements and select Screen, or click on an existing Screen element to open it. The Screen editor opens on the right.
Find the component in the sidebar. The left panel lists all available components — native ones grouped by type (Input, Display, Layout), managed package components below them. Search by name if you know what you're looking for. If you've installed Avonni, every component in the library appears there.
Drag it onto the canvas — or click to add. Drag from the sidebar onto the screen preview, or click the component name to drop it at the bottom of the screen. Components stack vertically by default. Add a Screen Column layout component if you want two side by side.
Configure its properties in the right panel. Click any component on the canvas to open its property panel — label, help text, required toggle, component-specific settings. For Avonni components, this opens the Component Builder: configure the label, set options, wire a variable, and see the result live without leaving the panel.
Wire it to a flow variable. Every input component has an API Name field — this maps to the flow variable it writes to. Set it to an existing variable or type a new name and Salesforce creates it. Whatever the user enters goes into that variable and carries through every subsequent screen and action in the flow.
Preview before saving. Click View in the Screen editor to see what the user will see, including how conditional visibility rules behave at runtime. For Avonni components, the live preview in the Component Builder makes this step redundant for most configuration work.
A Screen element open in Flow Builder: components on the left, the screen in the middle, properties on the right.
Variable naming tip: Prefix your variables consistently — something like inp_ for user inputs and rec_ for record queries. Flows accumulate variables quickly. Without a naming scheme, the variable picker becomes a wall of text before long.
The Native Salesforce Components
A complete reference of what ships with every Salesforce org today.
Salesforce documents 39 standard screen components today, and the list grows every release. Here is what that covers, grouped by what you reach for it.
Type
Notable components
What to know
Input34
Text, Long Text Area, Picklist, Multi-Select Picklist, Dependent Picklists, Radio Buttons, Radio Button Group, Checkbox, Checkbox Group, Choice Lookup, Visual Picker, Lookup, Data Table, Kanban Board (beta), Date, Time, Date & Time, Number, Currency, Email, Phone, URL, Password, Name, Address, Slider, Toggle, File Upload, Action Button, Display Image
Collect data from users, or let them pick from a list of records. Most support validation rules, conditional visibility, and direct wiring to flow variables. Salesforce files almost everything here as a Screen Input Component, including Data Table and Display Image, which mostly show rather than collect. Data Table lists records and lets users select rows, and since Summer '26 a lookup column can show the related record's name and link to it. Since Spring '26 it also sorts columns and edits text, number, currency, percent, email, phone and checkbox cells in place. Picklists, dates and lookups stay read-only.
Display4
Display Text, Message, Repeater, File Preview
Show information to users — no data collected. Display Text supports merge fields for dynamic inline content: {!Contact.FirstName} Message shows status text with informational, success, warning and critical styling. Repeater collects information about several items of the same type, and File Preview shows a file inline.
Layout1
Section
Organize the screen structure. A Section groups fields under a header and splits them into columns. That is the full extent of native layout control: no tabs, no accordions, no stepped wizards.
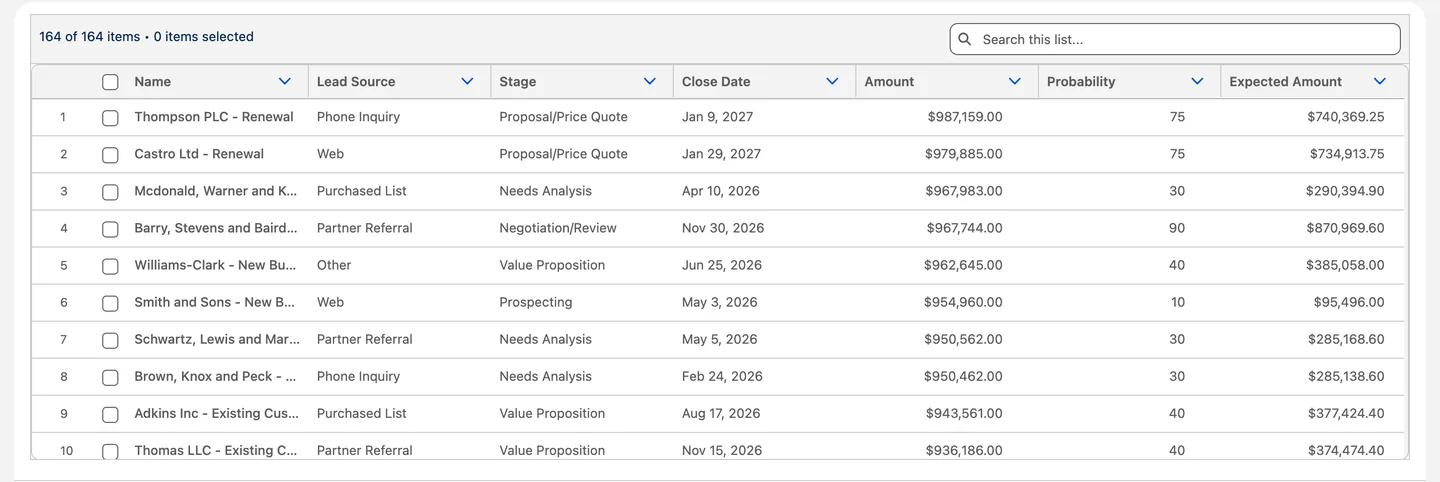
The native Data Table in a Screen Flow: a search bar, row selection and plain text columns.
Where Native Components Fall Short
The standard library is solid. It is not complete.
Card-based selection stops at tiles. Salesforce now ships a Visual Picker component: tiles that pair text with an icon, which covers the simple case. What it does not give you is a photo on each card, an avatar, a description under the label, or a grid you control at each breakpoint. For a picker that has to look like part of a product, the gap is still there.
The Datatable edits only the simple fields. Since Spring '26 users can sort columns and edit text, number, currency, percent, email, phone and checkbox cells in place. Picklists, dates and lookups stay read-only, and there are no custom column types and no bulk actions. The moment someone asks whether users can change a stage or a close date directly in the table, the answer with native is still no. For flows built around reviewing or updating lists of records, this creates real friction. A proper data table for Salesforce flows handles these cases differently.
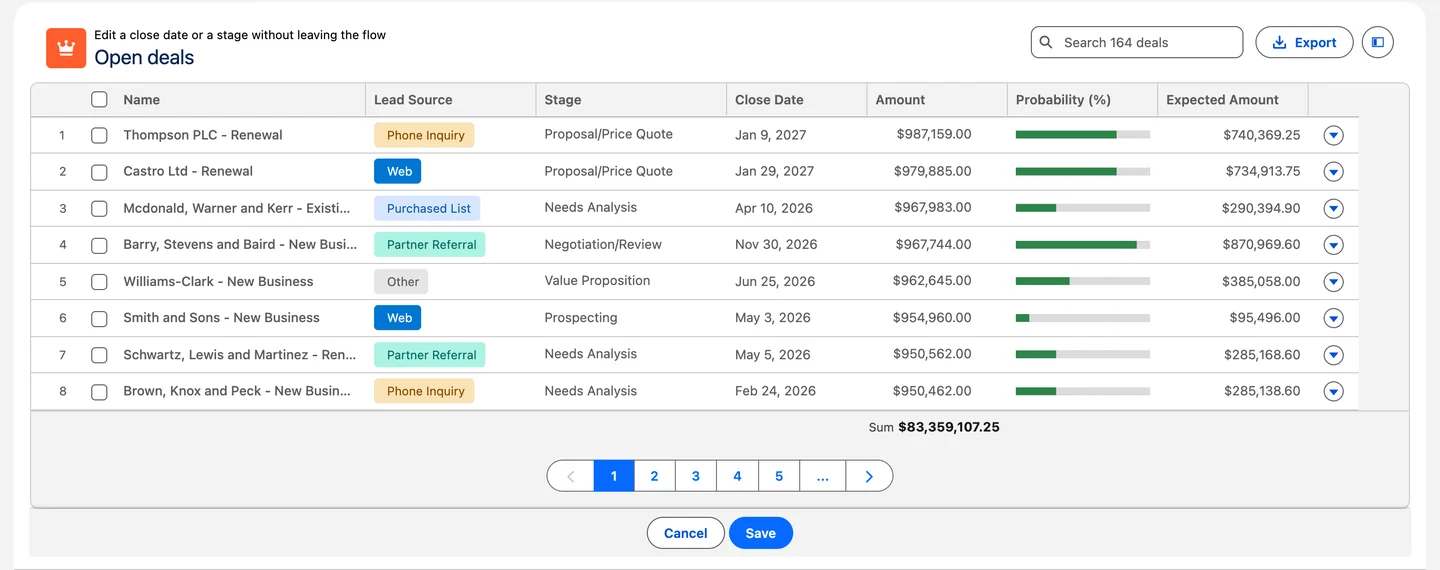

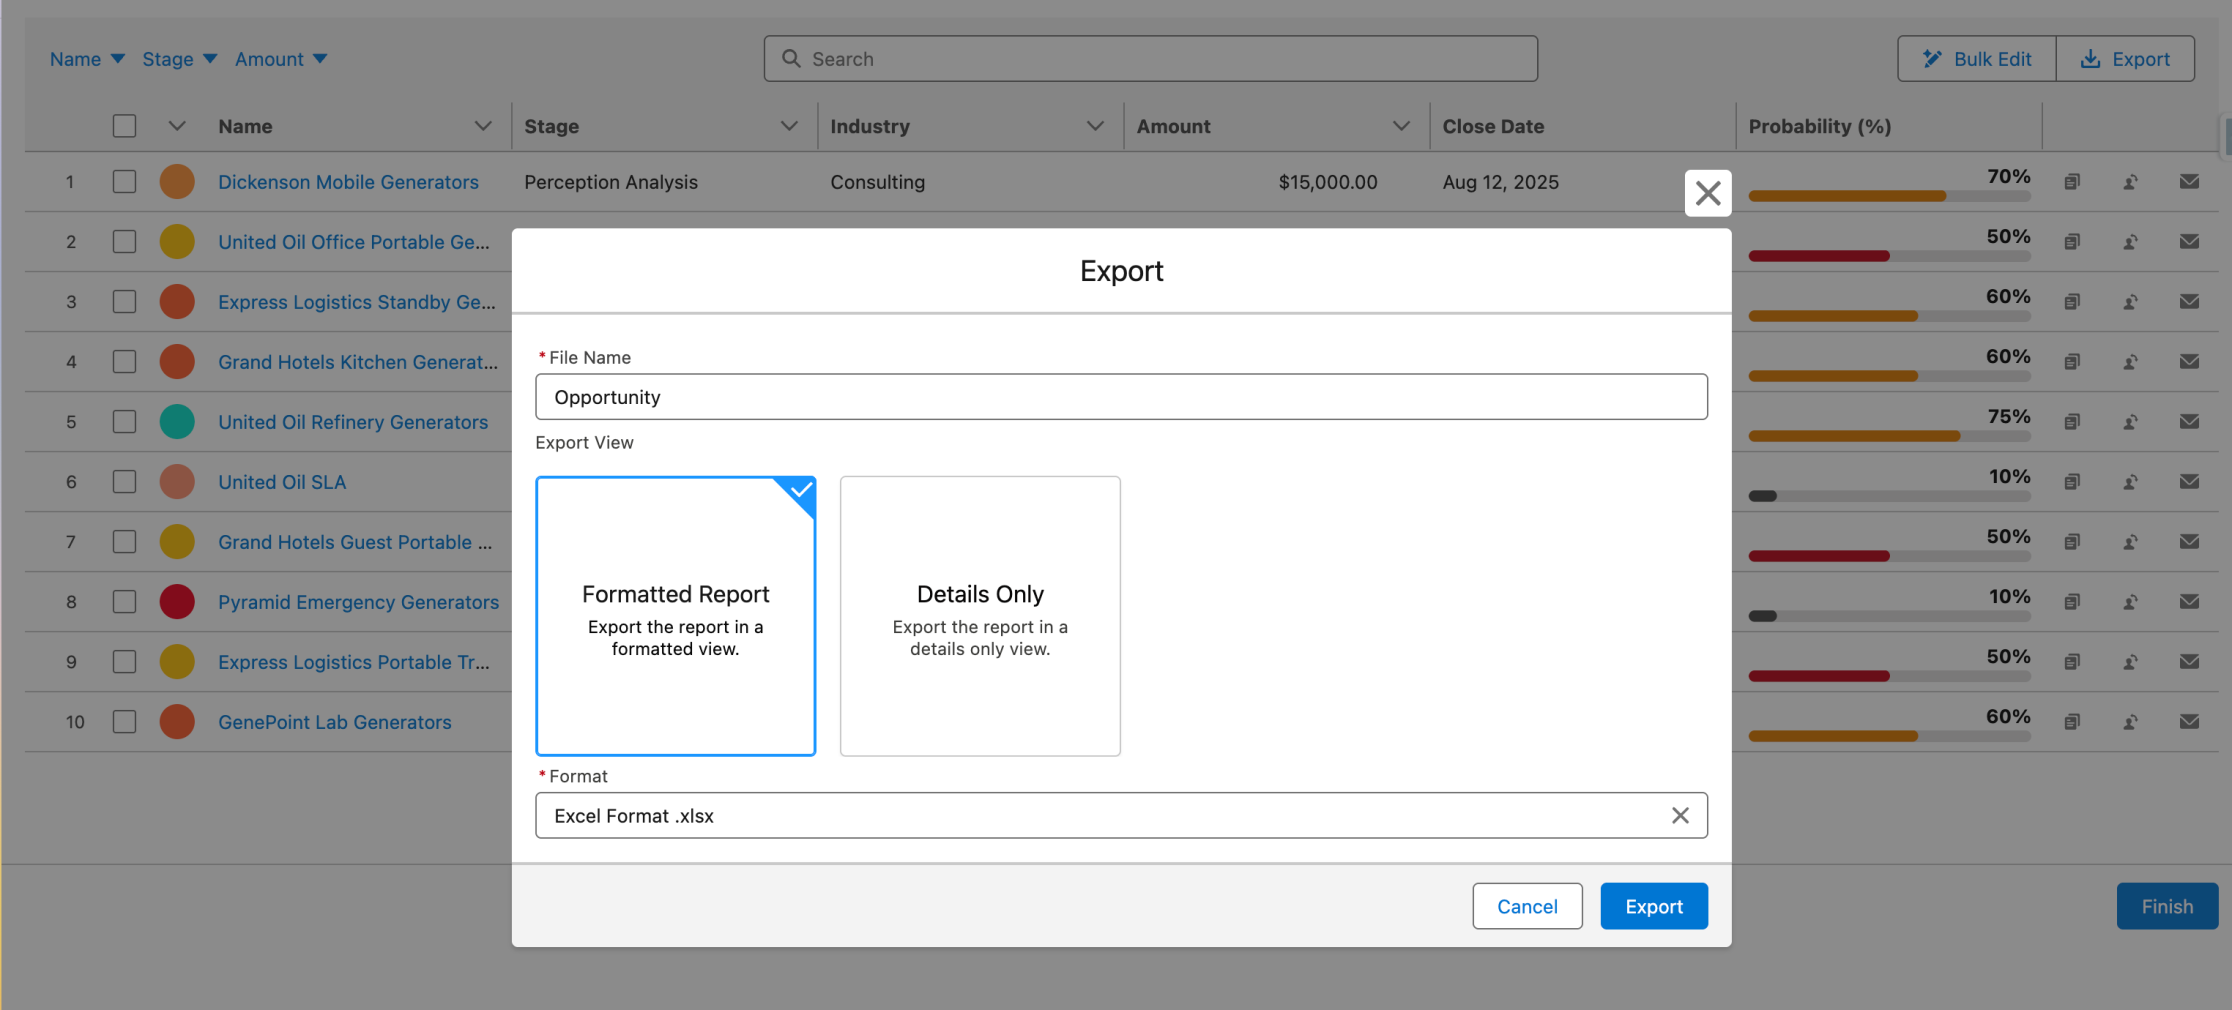
The same 164 opportunities in the Avonni Data Table: badges, probability bars, a column total, an export button and row actions.
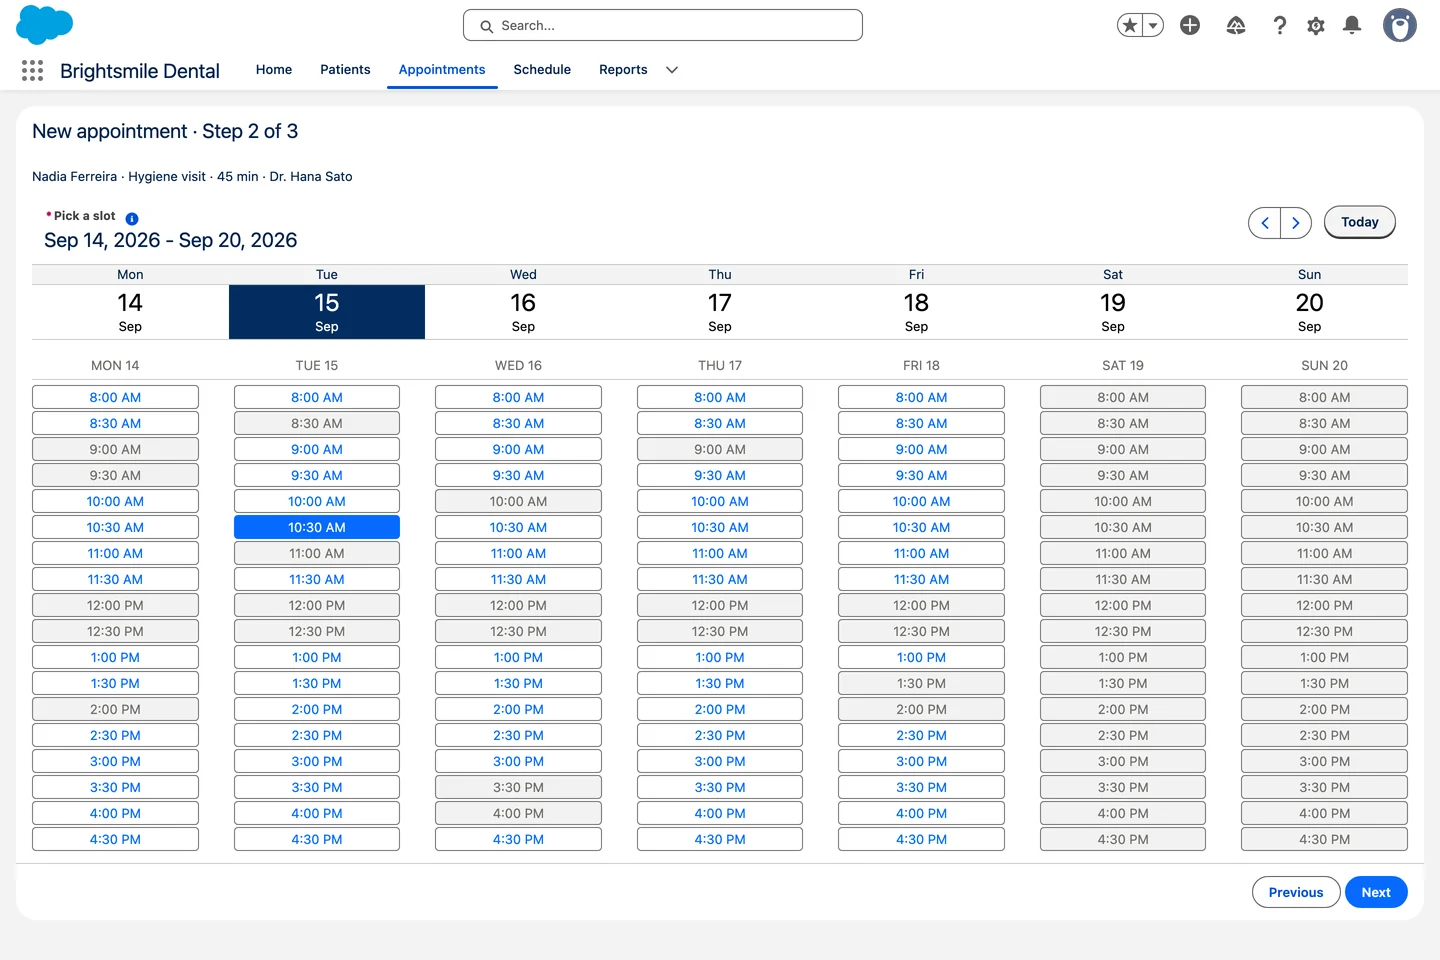
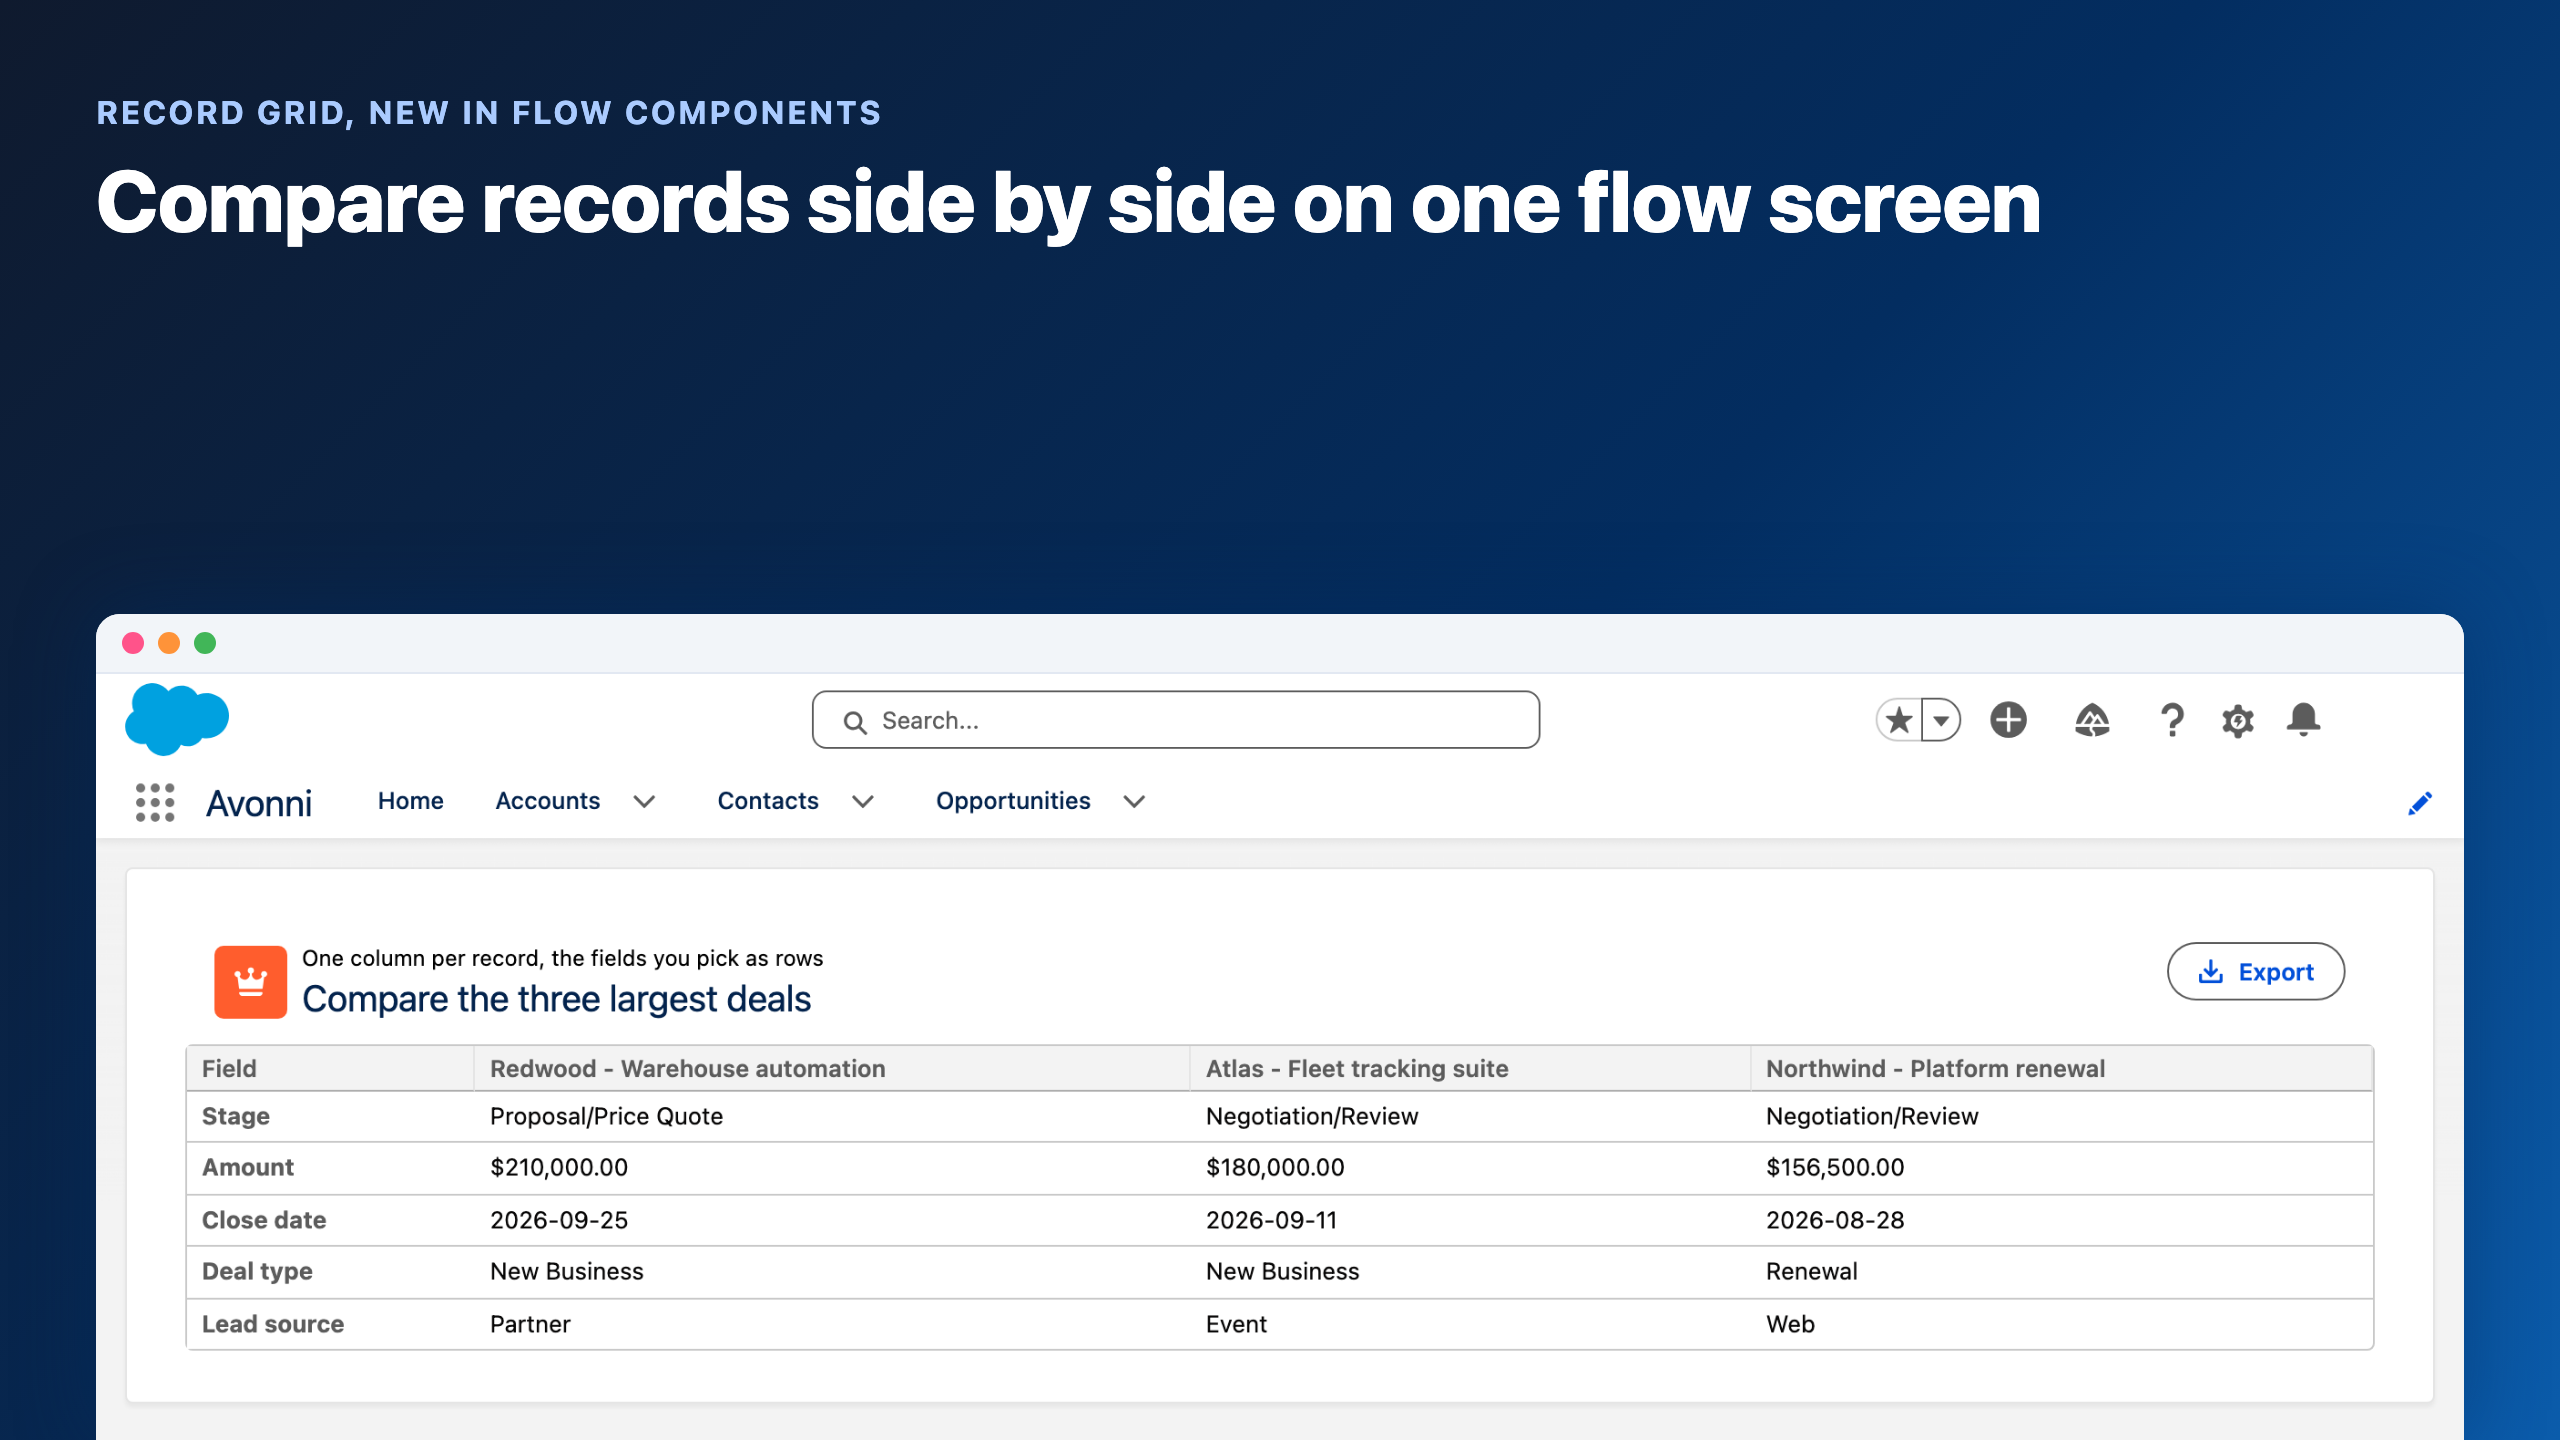
No calendar view. Scheduling-heavy flows — booking appointments, reviewing availability windows, picking date ranges — have no native calendar component. You stack date pickers and hope users piece it together. For anything where "show me available slots this week" is part of the UX, a dedicated calendar component for flows is the more honest answer.

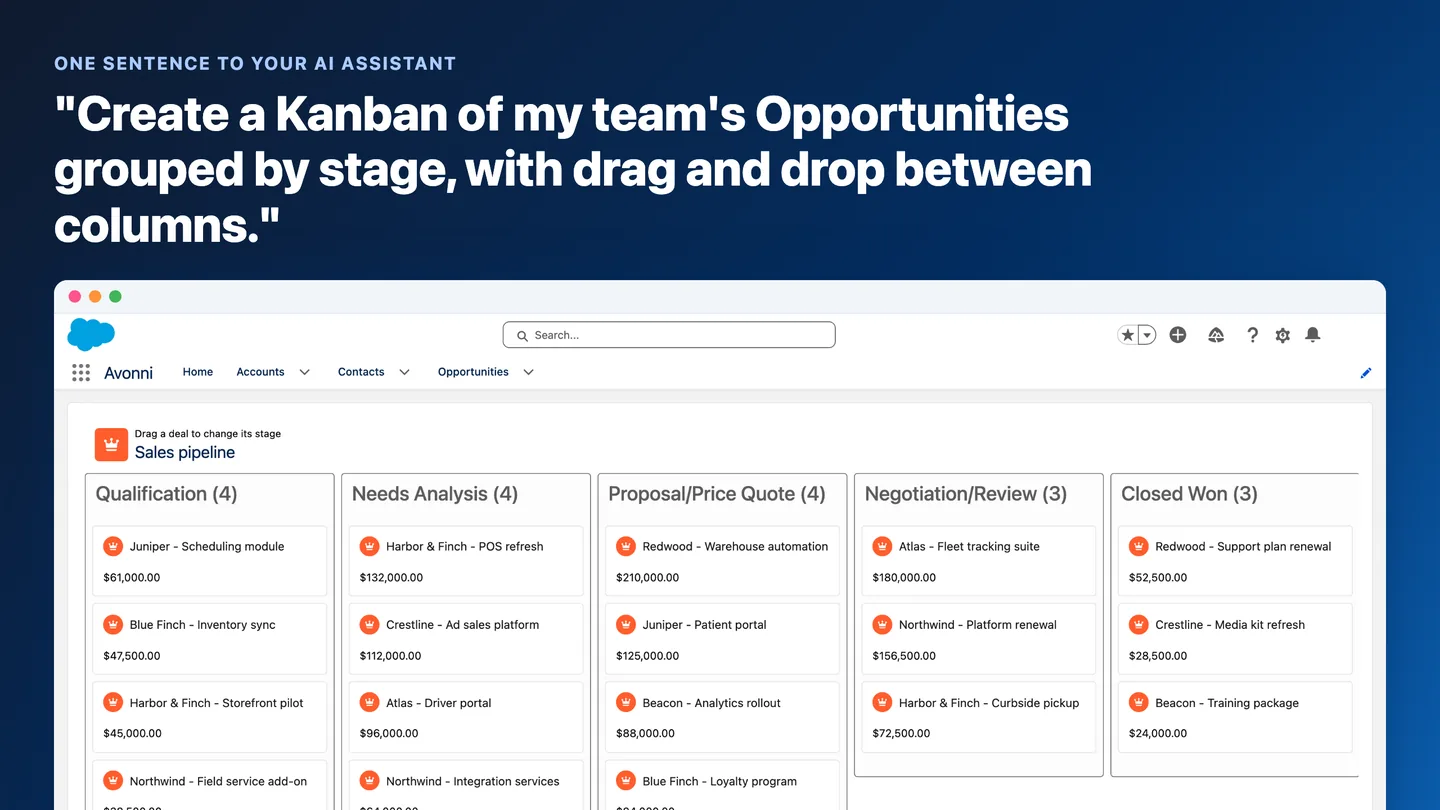
The native kanban is read-only. Salesforce ships a Kanban Board component in beta: records as cards in columns that represent stages, which is real progress for visibility. Users cannot drag a card from one column to another, so a stage-based process still ends at a picklist somewhere.
Native Kanban Board (beta): the card doesn't move.Avonni Kanban: the same drag moves the card to the next stage.
No charts or metrics display. If you want to show a user their current stats before they take an action, you're stuck with Display Text and number fields.
Limited layout control. Sections and columns get you partway. Tabs, full accordions, stepped wizards with a progress indicator at the top — those need custom work or a third-party package.
This isn't a Salesforce problem so much as a scope decision. The native components cover most flows. The gaps show up on the 20% where UX actually matters.
Reactive Screen Components
Until Winter '24, screen components on the same screen were isolated from each other. A picklist selection couldn't immediately filter the options in another picklist without navigating away first. Multi-field interactions required workarounds — multiple screens, decision elements, navigation loops that confused users.
Reactive screen components changed this. Components on the same screen can now respond to each other in real time, with no page navigation. A lookup selection filters a dependent picklist. A toggle shows or hides sections. A checkbox updates a displayed total — all immediately, without leaving the screen.
Reactive components went GA in Winter '24, and they are automatic for any flow running on API version 59.0 or later. The official documentation covers setup and supported patterns: Reactive Screen Components in Flows.
In practice: fewer screens, simpler flow logic, less user confusion. What used to need four screens and a loop often becomes one screen with properly wired components.
Worth knowing: Third-party components including Avonni's support reactivity. A Visual Picker selection can drive what populates in a Datatable. A Kanban column change can update a metric card on the same screen. The combination of rich component types and reactive wiring opens up UX that wasn't practical before reactivity.
How reactive wiring actually works
Every input component on a screen writes to a flow variable when the user interacts with it — that's always been true. What reactivity changed is that other components on the same screen now re-read their properties in real time as those variables update. No navigation. No separate screen.
The wiring is just variable references. Set Component A's API Name to a variable. In Component B's properties, reference that same variable using {!variableName}. When the user interacts with A, B updates immediately.
Practical examples that work today:
Toggle → conditional visibility. A toggle updates a boolean variable. Another component uses that variable in its Set Component Visibility rule. The component shows or hides the moment the user clicks — no navigation required.
Radio buttons → Display Text summary. Radio button selection updates a variable. A Display Text component shows "Service type: {!selectedType}". As the user changes their selection, the summary updates live on the same screen.
Picklist → dependent picklist. A Status picklist selection can filter the options shown in a sub-status picklist on the same screen — no multi-screen workaround needed.
Slider → live number display. A slider updates a numeric variable. A Display Text shows the current value. The number updates as the user drags.
What reactive components don't do
Reactive screen components work within a single screen — component to component, via shared variables. They don't run Get Records queries or Apex actions in the background while the user stays on screen. If you need to query records based on a user's selection and show the results on the same screen, that still requires navigating to a next screen where the query runs, then returning to display results — or building a custom LWC that handles the data fetch internally.
Reactivity is automatic on API version 59.0 and later. There's no separate toggle to enable. Reference a variable in a component's property, and if another component on the same screen updates that variable, yours re-renders. The Salesforce docs have a list of which component properties support reactive updates — not all of them do.
What Summer '26 and Winter '27 Added
Two releases have landed since this guide first went up, and both closed gaps it used to describe.
Summer '26 added the Radio Button Group component: the same single-select as Radio Buttons, laid out as compact buttons stacked horizontally on desktop and vertically on mobile. Data Table lookup columns now show the related record's name instead of its ID, with an option to turn that name into a link that opens the record in a new tab. Styling overrides reached eleven more components (Action Button, Address, Choice Lookup, Dependent Picklists, Email, Lookup, Name, Phone, Slider, Toggle, URL). Display Text can browse and upload static resource images without leaving Flow Builder. And two core actions arrived that screens lean on constantly: Show Toast Message and Open a Page. Summer '26 also put screen flows behind natural language: in the Agentforce panel you can describe a change and have it applied to an existing screen flow, in beta.
Winter '27 is the bigger one for anyone building screens at volume:
A Time component. Users pick a time value on a screen and the output drives the rest of the flow. Scheduling flows no longer need a full date-time field where a time would do.
Screen flows as mass actions. Configure a mass quick action on a list view or a related list and it launches a screen flow that receives the IDs of the selected records. One guided screen can process fifty records instead of one.
Reactive formulas in conditional visibility. A section can now appear or disappear from a formula that recalculates on the same screen.
If your org is still on Spring '26 or earlier, the Time component and the mass actions are the two worth planning for.
Real-World Use Cases
Case management intake. A support team uses a flow to triage incoming requests. Native components handle the text fields and lookups fine. The priority field — meant to let agents pick from three visually distinct options — ends up as a radio button. It works, but it's not what anyone designed. The native Visual Picker closes that gap with tiles and icons. When those three options each need a photo and a line of description, that is where a richer picker earns its place.
Field team inspection forms. Technicians fill out inspection checklists on a phone, sometimes offline. Native components hold up: text inputs, checkboxes, file uploads. The problem is layout. Twenty fields stacked vertically on a phone screen is genuinely hard to use. Sections and conditional visibility help. A mobile-aware layout component with tabs handles it properly.
Appointment scheduling. A service team lets customers book slots through an Experience Cloud flow. Picking a date works fine with native. "Pick a slot from available times this week" is a different UX problem entirely — that's a calendar, not a date picker. Without a calendar component, you're either building workarounds or shipping something that frustrates users.
Record enrichment flows. A sales team uses a flow to update multiple account records in bulk. Native Datatable lets them select rows and, since Spring '26, edit simple text and number cells. Updating a status or a date is another matter: picklists, dates and lookups stay read-only in the native table. An advanced data table with inline editing turns what would be a multi-step navigation exercise into something that takes a few minutes.
Location-based dispatching. Service dispatchers assign technicians to jobs based on proximity. A map component that shows job locations and available technicians on the same screen, with click-to-assign, is the right UX for this. Native has nothing close.
Bulk review from a list view. Winter '27 lets a mass quick action on a list view launch a screen flow with the IDs of the selected records. That turns one screen into a bulk workspace: fifty cases in front of the user at once, each row corrected in place, one submit at the end. The native Data Table displays them and edits the simple fields in place, but a status, a date or an owner still has to be changed somewhere else, which is exactly where a table that edits every field type changes the shape of the flow.
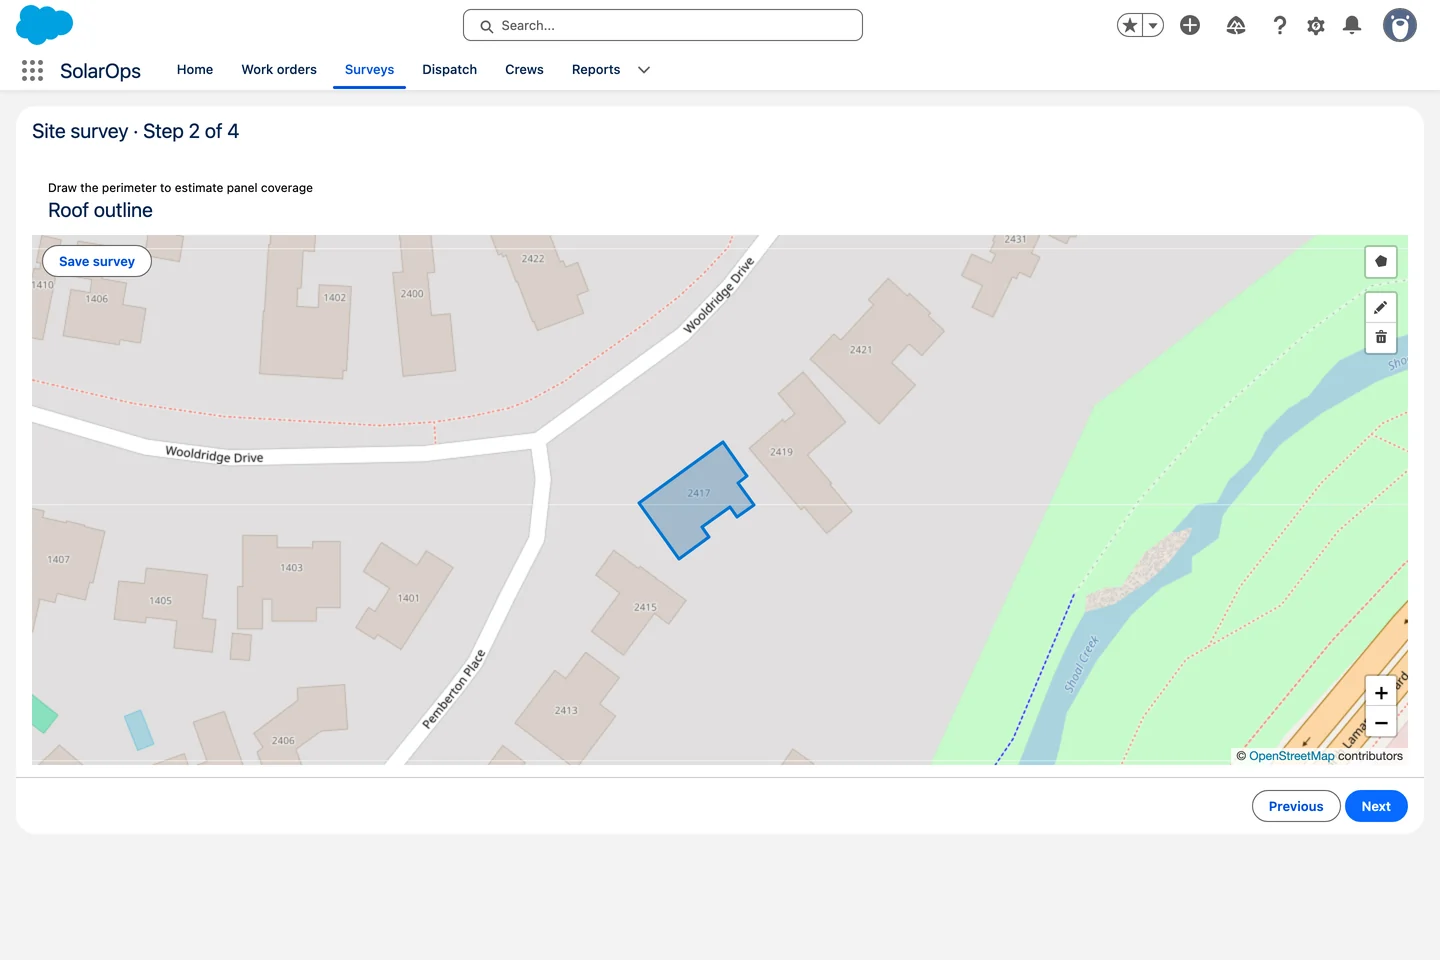
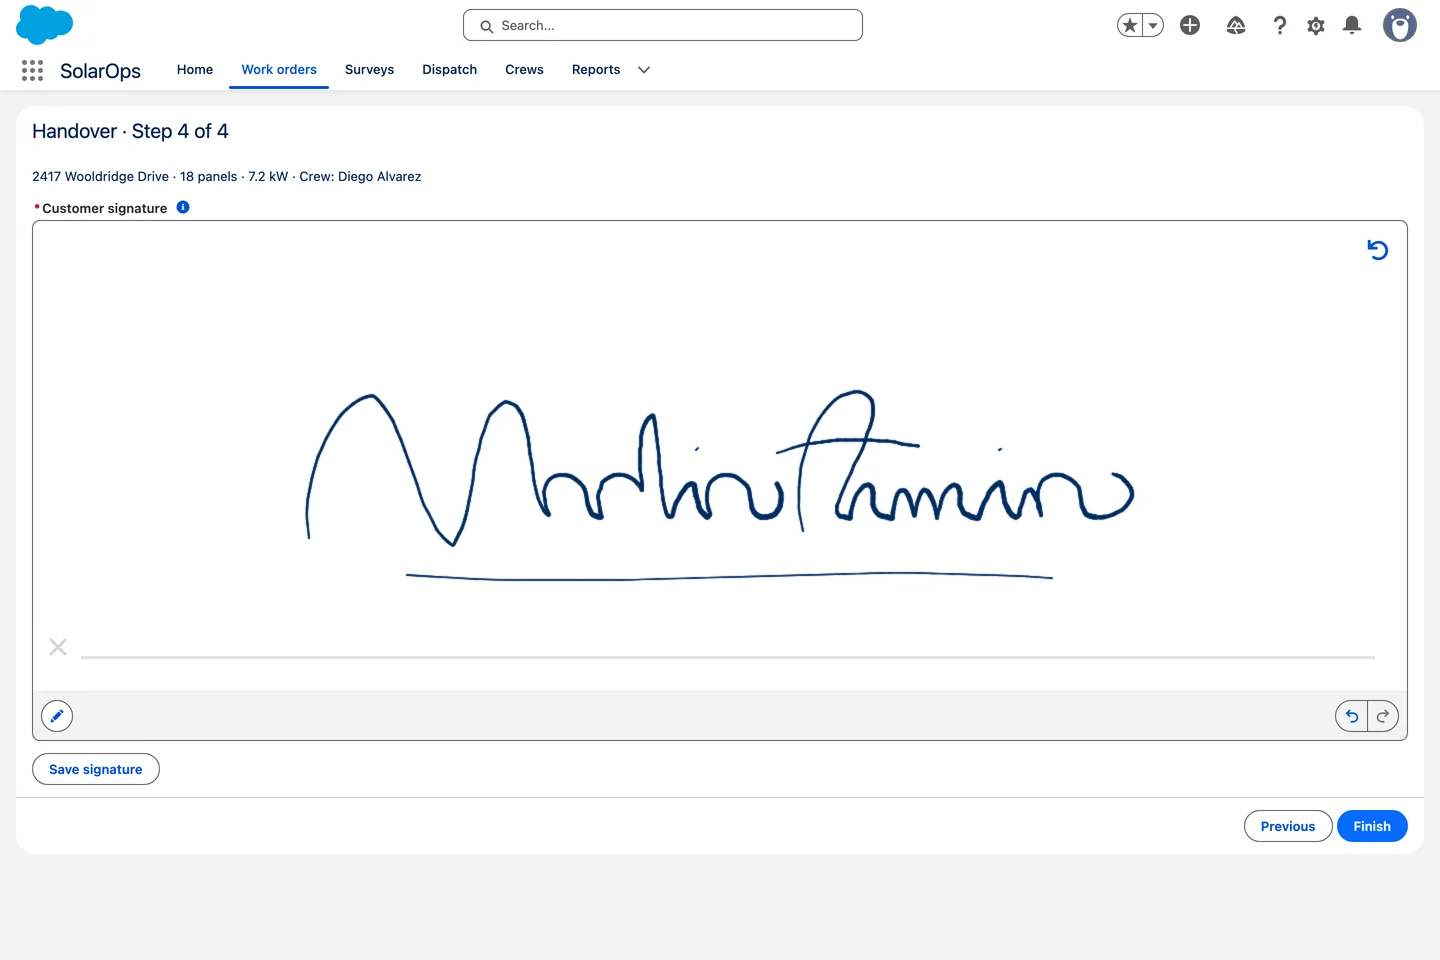
Site survey: draw the roof outline on a map, step 2 of 4.Handover: the customer signs on screen, step 4 of 4.Booking: pick a free slot in the week, step 2 of 3.
Community Components: UnofficialSF
Before commercial packages had much traction, the Salesforce community built its own. UnofficialSF, maintained by Alex Edelstein at Salesforce, is the main hub for free community-contributed flow screen components.
The list is long and genuinely useful: Quick Lookup, Quick Choice (an improved picklist), Flexcard, an LWC Datatable significantly better than native, Barcode Scanner, Signature Capture, Rich Text Input, and dozens more.
Quality and maintenance vary by component. Some haven't been updated in years. Others depend on a single developer staying interested. In enterprise orgs — especially those with strict AppExchange security policies — unmanaged community code is often a blocker. Some organizations simply won't allow it.
For personal projects, internal tooling, and quick prototypes, UnofficialSF is excellent. For production flows in regulated industries or large orgs, you want something with a support contract behind it.
Custom LWC vs. a Managed Package: Which Makes Sense?
If native and UnofficialSF both fall short, you have two remaining paths: build a custom Lightning Web Component, or install a managed package. Admins sometimes assume a developer is the only answer. It depends.
Build a custom LWC when:
The component needs behavior that doesn't exist anywhere — a very specific interaction tied to proprietary business logic, a deeply branded UI that no package will let you match, or an integration with an internal system that a managed package couldn't reach. Custom LWCs are the right call when uniqueness is the requirement.
The real cost: a custom LWC is a software artifact. It needs a developer to build it, someone to test it across Salesforce releases, and a process to maintain it when something breaks. If your admin team owns the flow but a developer owns the component, you've introduced a dependency that slows every future change.
Use a managed package when:
The component you need already exists in the package's library, and the use case is recognizable — a calendar, a data table with inline editing, a card picker, a kanban board. These are solved problems. A managed package gives you a tested implementation on day one, with upgrades handled by the vendor and support available if something breaks.
The practical test: if you can describe what you need in a sentence a product manager would recognize, a managed package almost certainly has it. If you're describing something genuinely unique to your org, that's a custom LWC conversation.
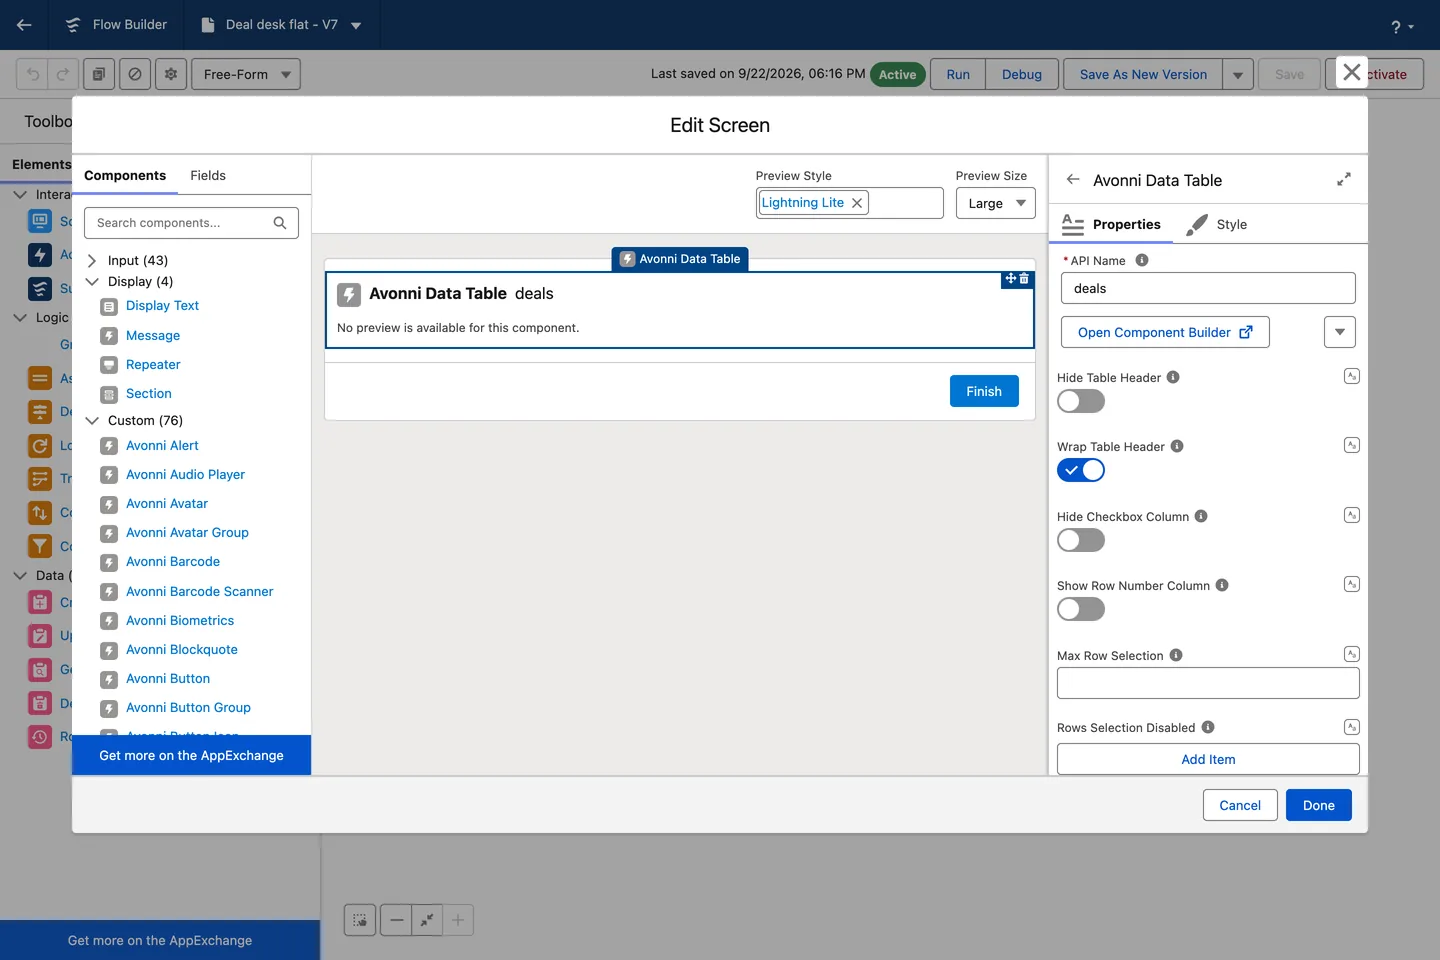
The Component Builder opened on the Data Table from Flow Builder. Columns, styles and actions are set visually, with a live preview.
For most admins building production flows, the managed package path is faster, cheaper over time, and keeps the flow fully maintainable without a developer in the loop for every change.
Commercial Packages on the AppExchange
The AppExchange has a handful of paid flow screen component packages. They vary in library size, release cadence, and what support actually looks like when something breaks. Before committing to one, the useful things to compare: how many components are included, whether the package has been updated within the last six months, and whether there's a real support contract or just a community forum.
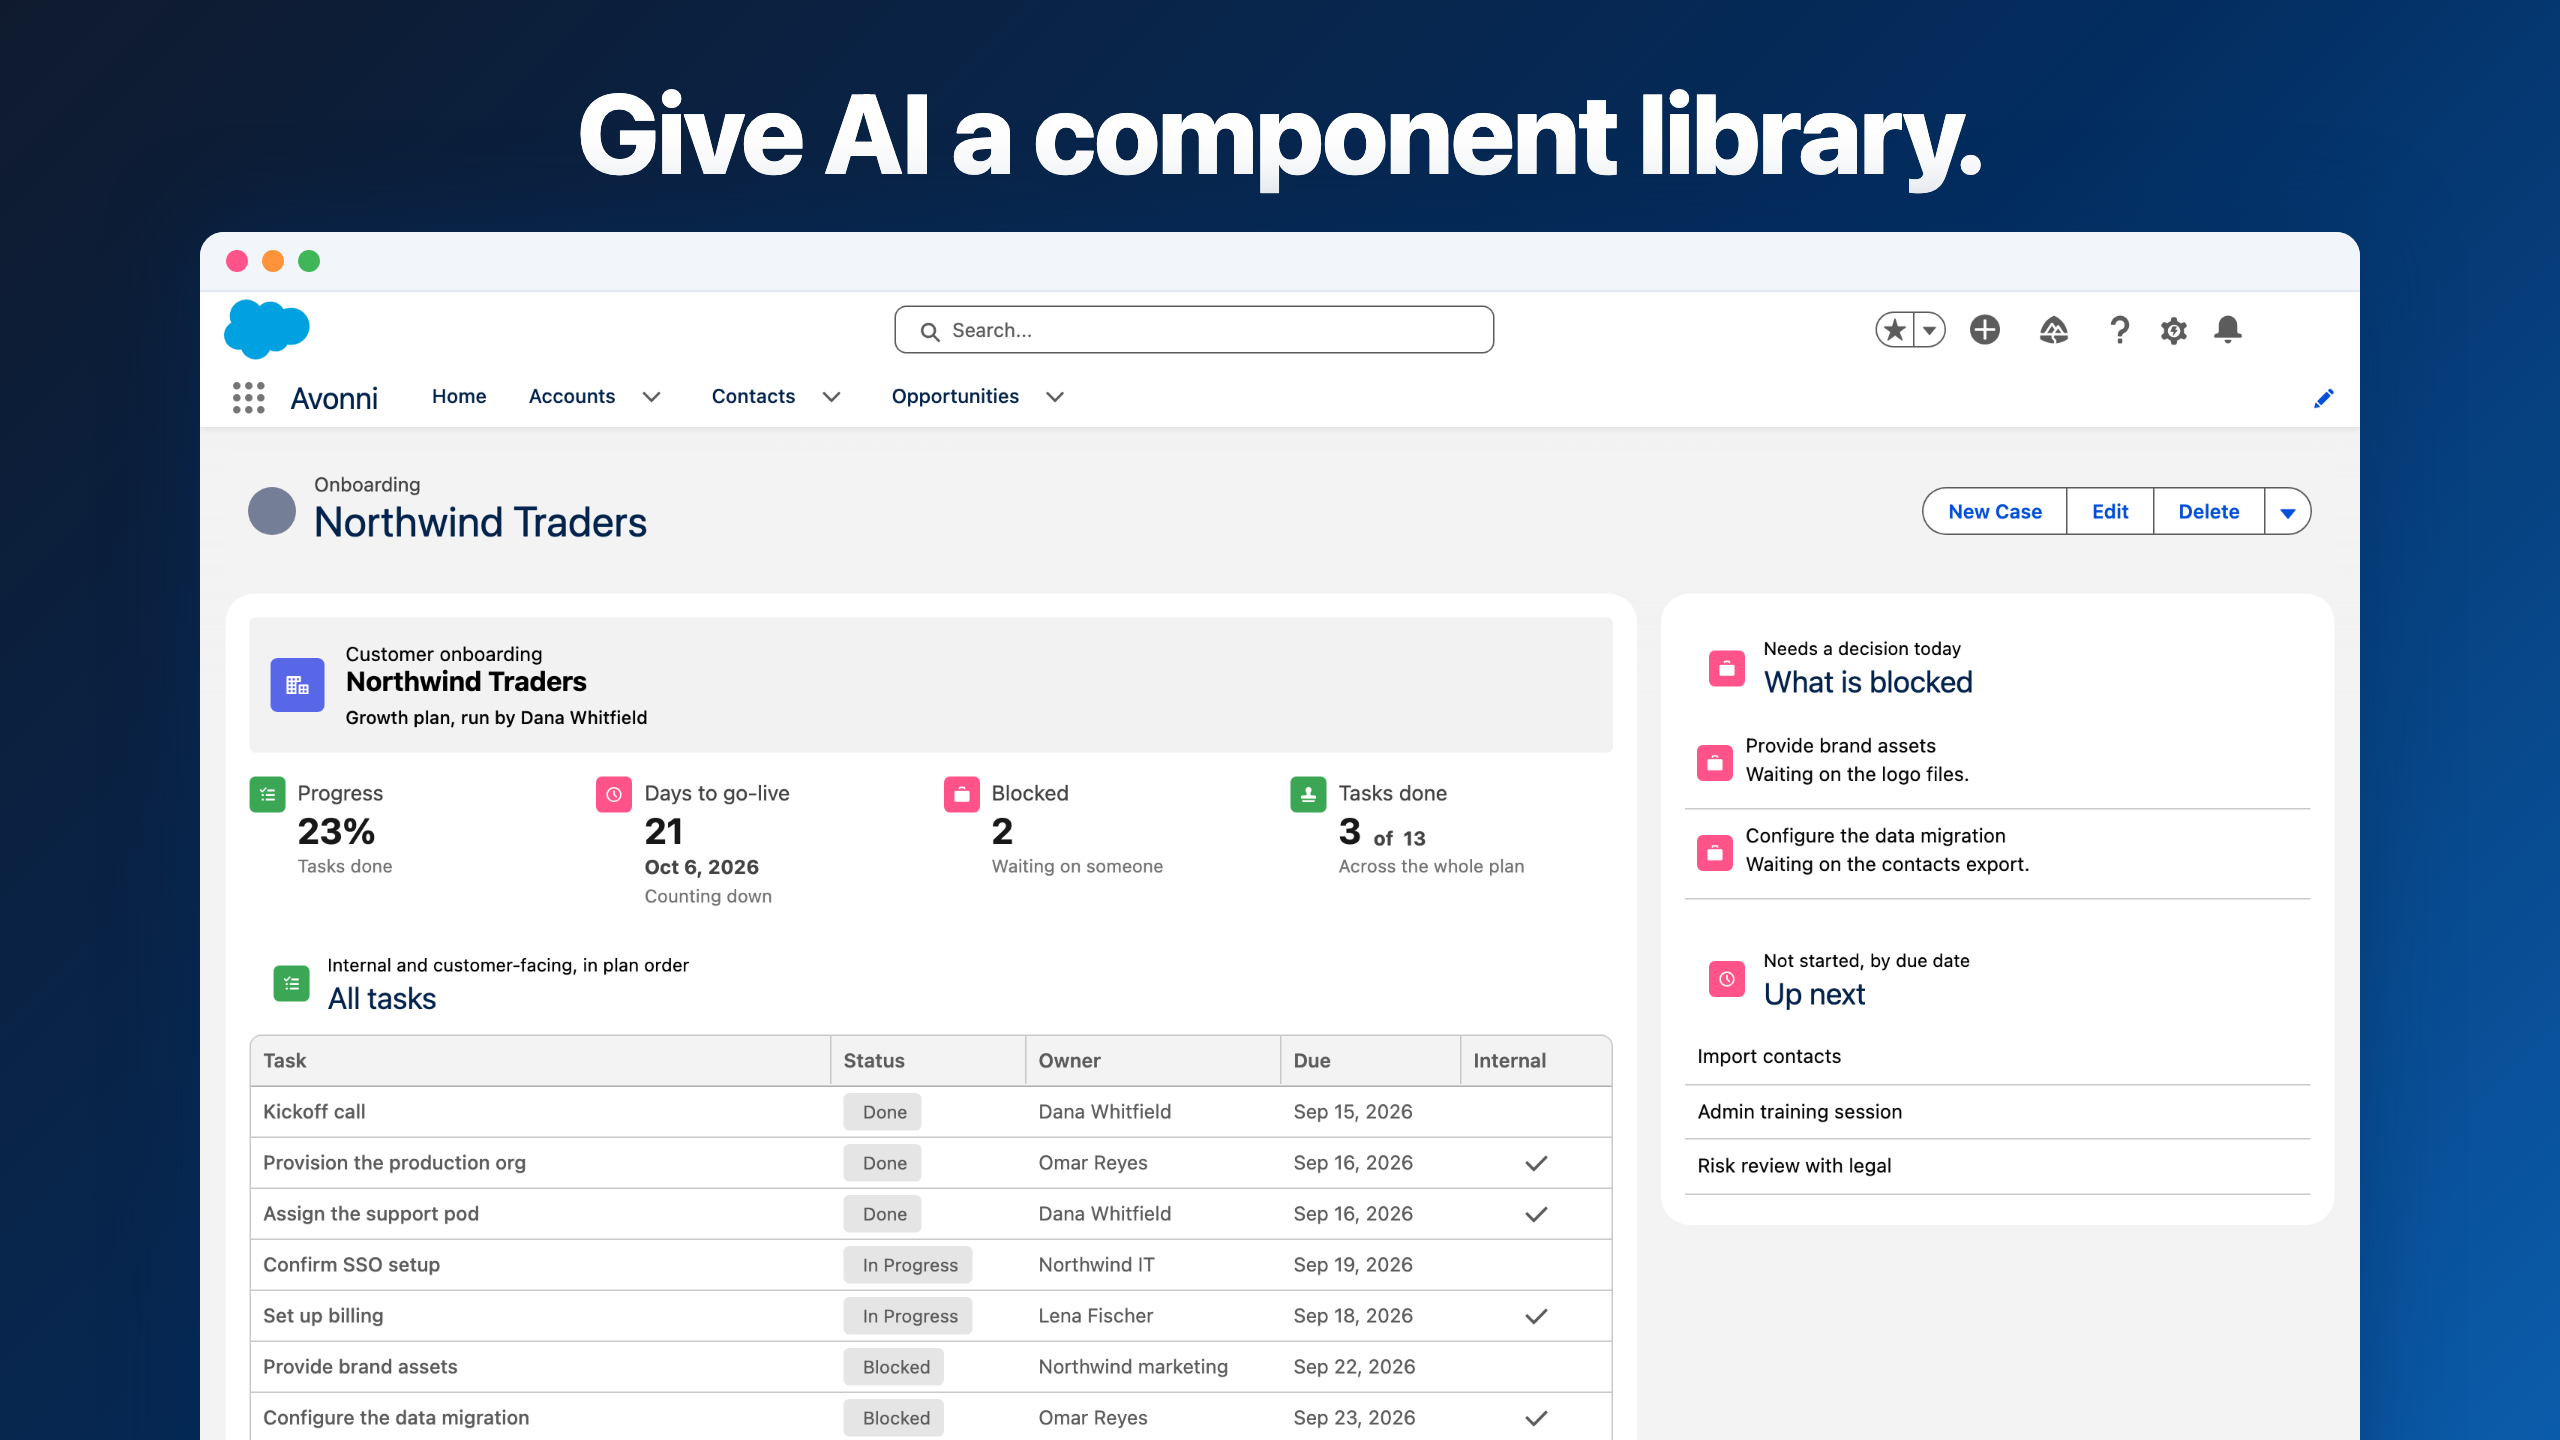
Avonni Flow Screen Components — the largest managed library on the AppExchange, with 70+ components across data input, display, and layout. Every Avonni component opens a configuration panel with live preview, so admins can style components, wire interactions, and test behavior without writing code. That Component Builder is what makes the difference day-to-day — most packages give you components with property panels, Avonni gives you a visual editor where you see exactly what you're building.
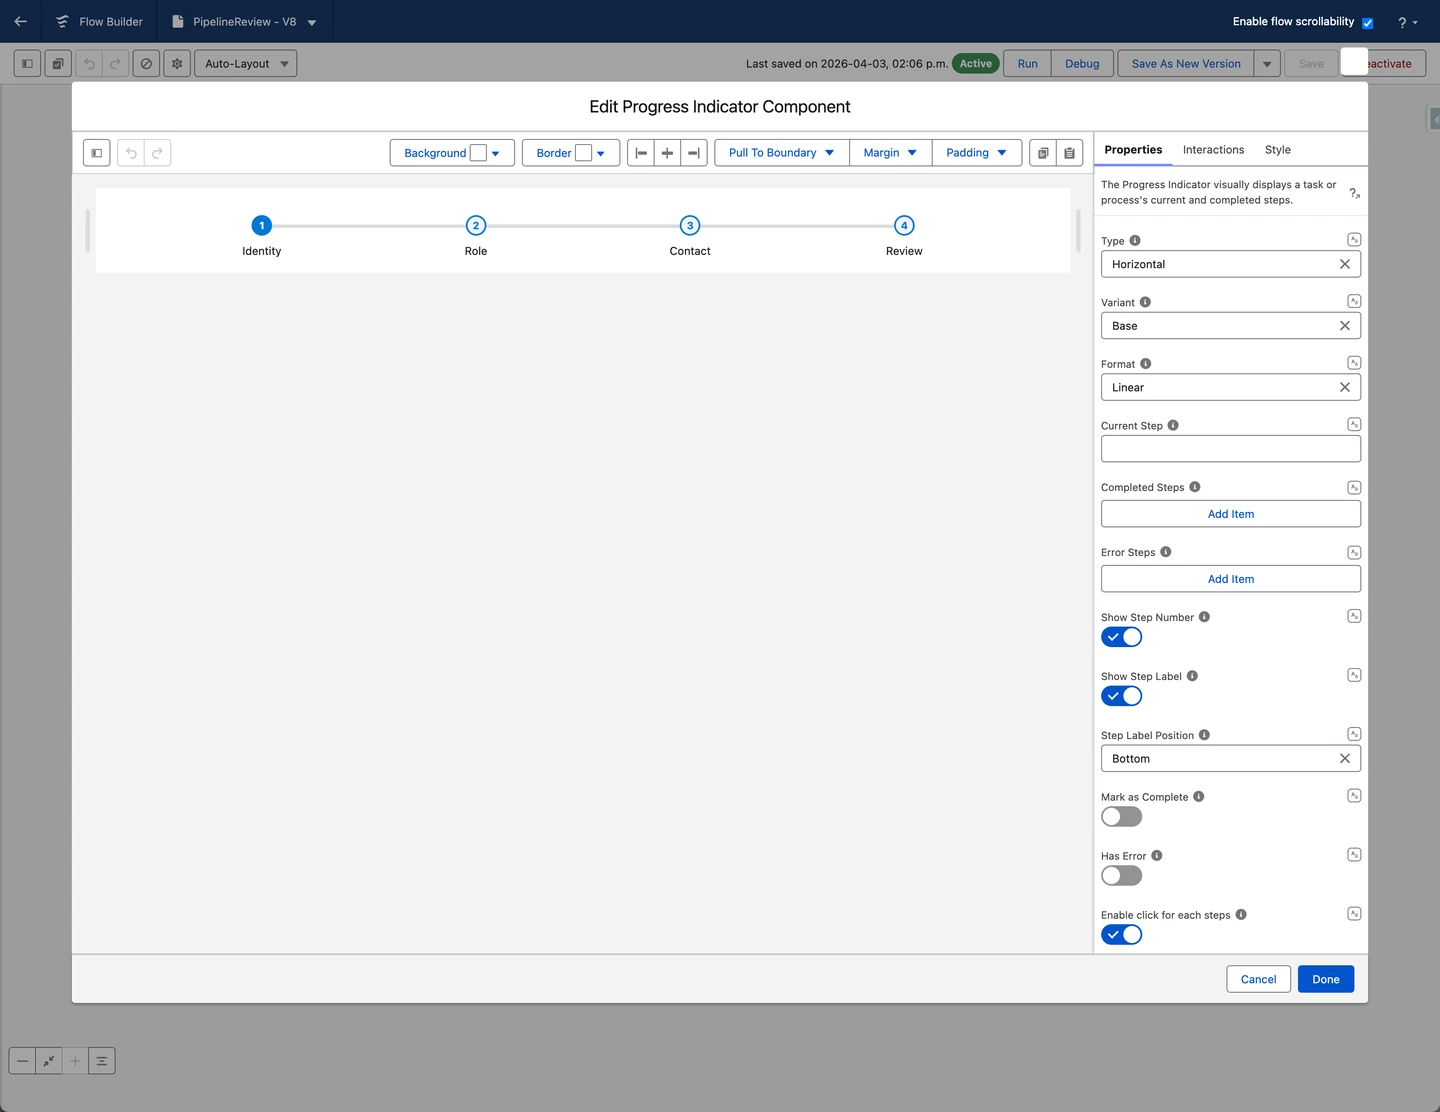
The Component Builder open on Avonni's Progress Indicator. Change the type, variant, or step labels on the right — the 4-step preview on the left updates immediately.
What's in the Avonni library that native doesn't have, just to name a few:
Visual Picker — card-based selection with images, icons, and descriptions
Kanban Board — drag-and-drop stage management inside a flow screen
Calendar — full date/event calendar with click interactions wired to flow variables
Components work in any screen flow context: Flow Builder for internal users, Experience Cloud for external users, App Builder pages with embedded flows. Pricing is per-org and scales from single-org installs to enterprise agreements — the AppExchange listing has current details. There is a free trial.
How to Choose
Start native. Free, supported, handles most flows. Build it first with what's available — you'll know quickly when you've hit a real limit.
If you hit that limit on a non-critical flow, check UnofficialSF. Good chance someone already built what you need, for free.
If you're building flows at scale — multiple teams, customer-facing flows, flows that need to match a design standard, flows that a stakeholder described as needing to feel like a real product — a managed package makes sense. Consistent components, vendor support, a library you can rely on across dozens of flows without auditing each one individually.
The cost math shifts fast. A developer building a custom kanban component is a multi-day project. An admin configuring the same component in 20 minutes with a managed package is a different calculation. The breakeven tends to happen sooner than people expect.
Simple decision tree: Does native cover it? → Yes → Use native / No → Production org? → Yes → Managed package / No → UnofficialSF have it? → Yes → UnofficialSF / No → Managed package.
Tips for Better Flow Screens
Use sections and columns. A single-column screen with 15 stacked fields is exhausting — group related inputs, use two columns for short fields, break long forms into labeled sections.
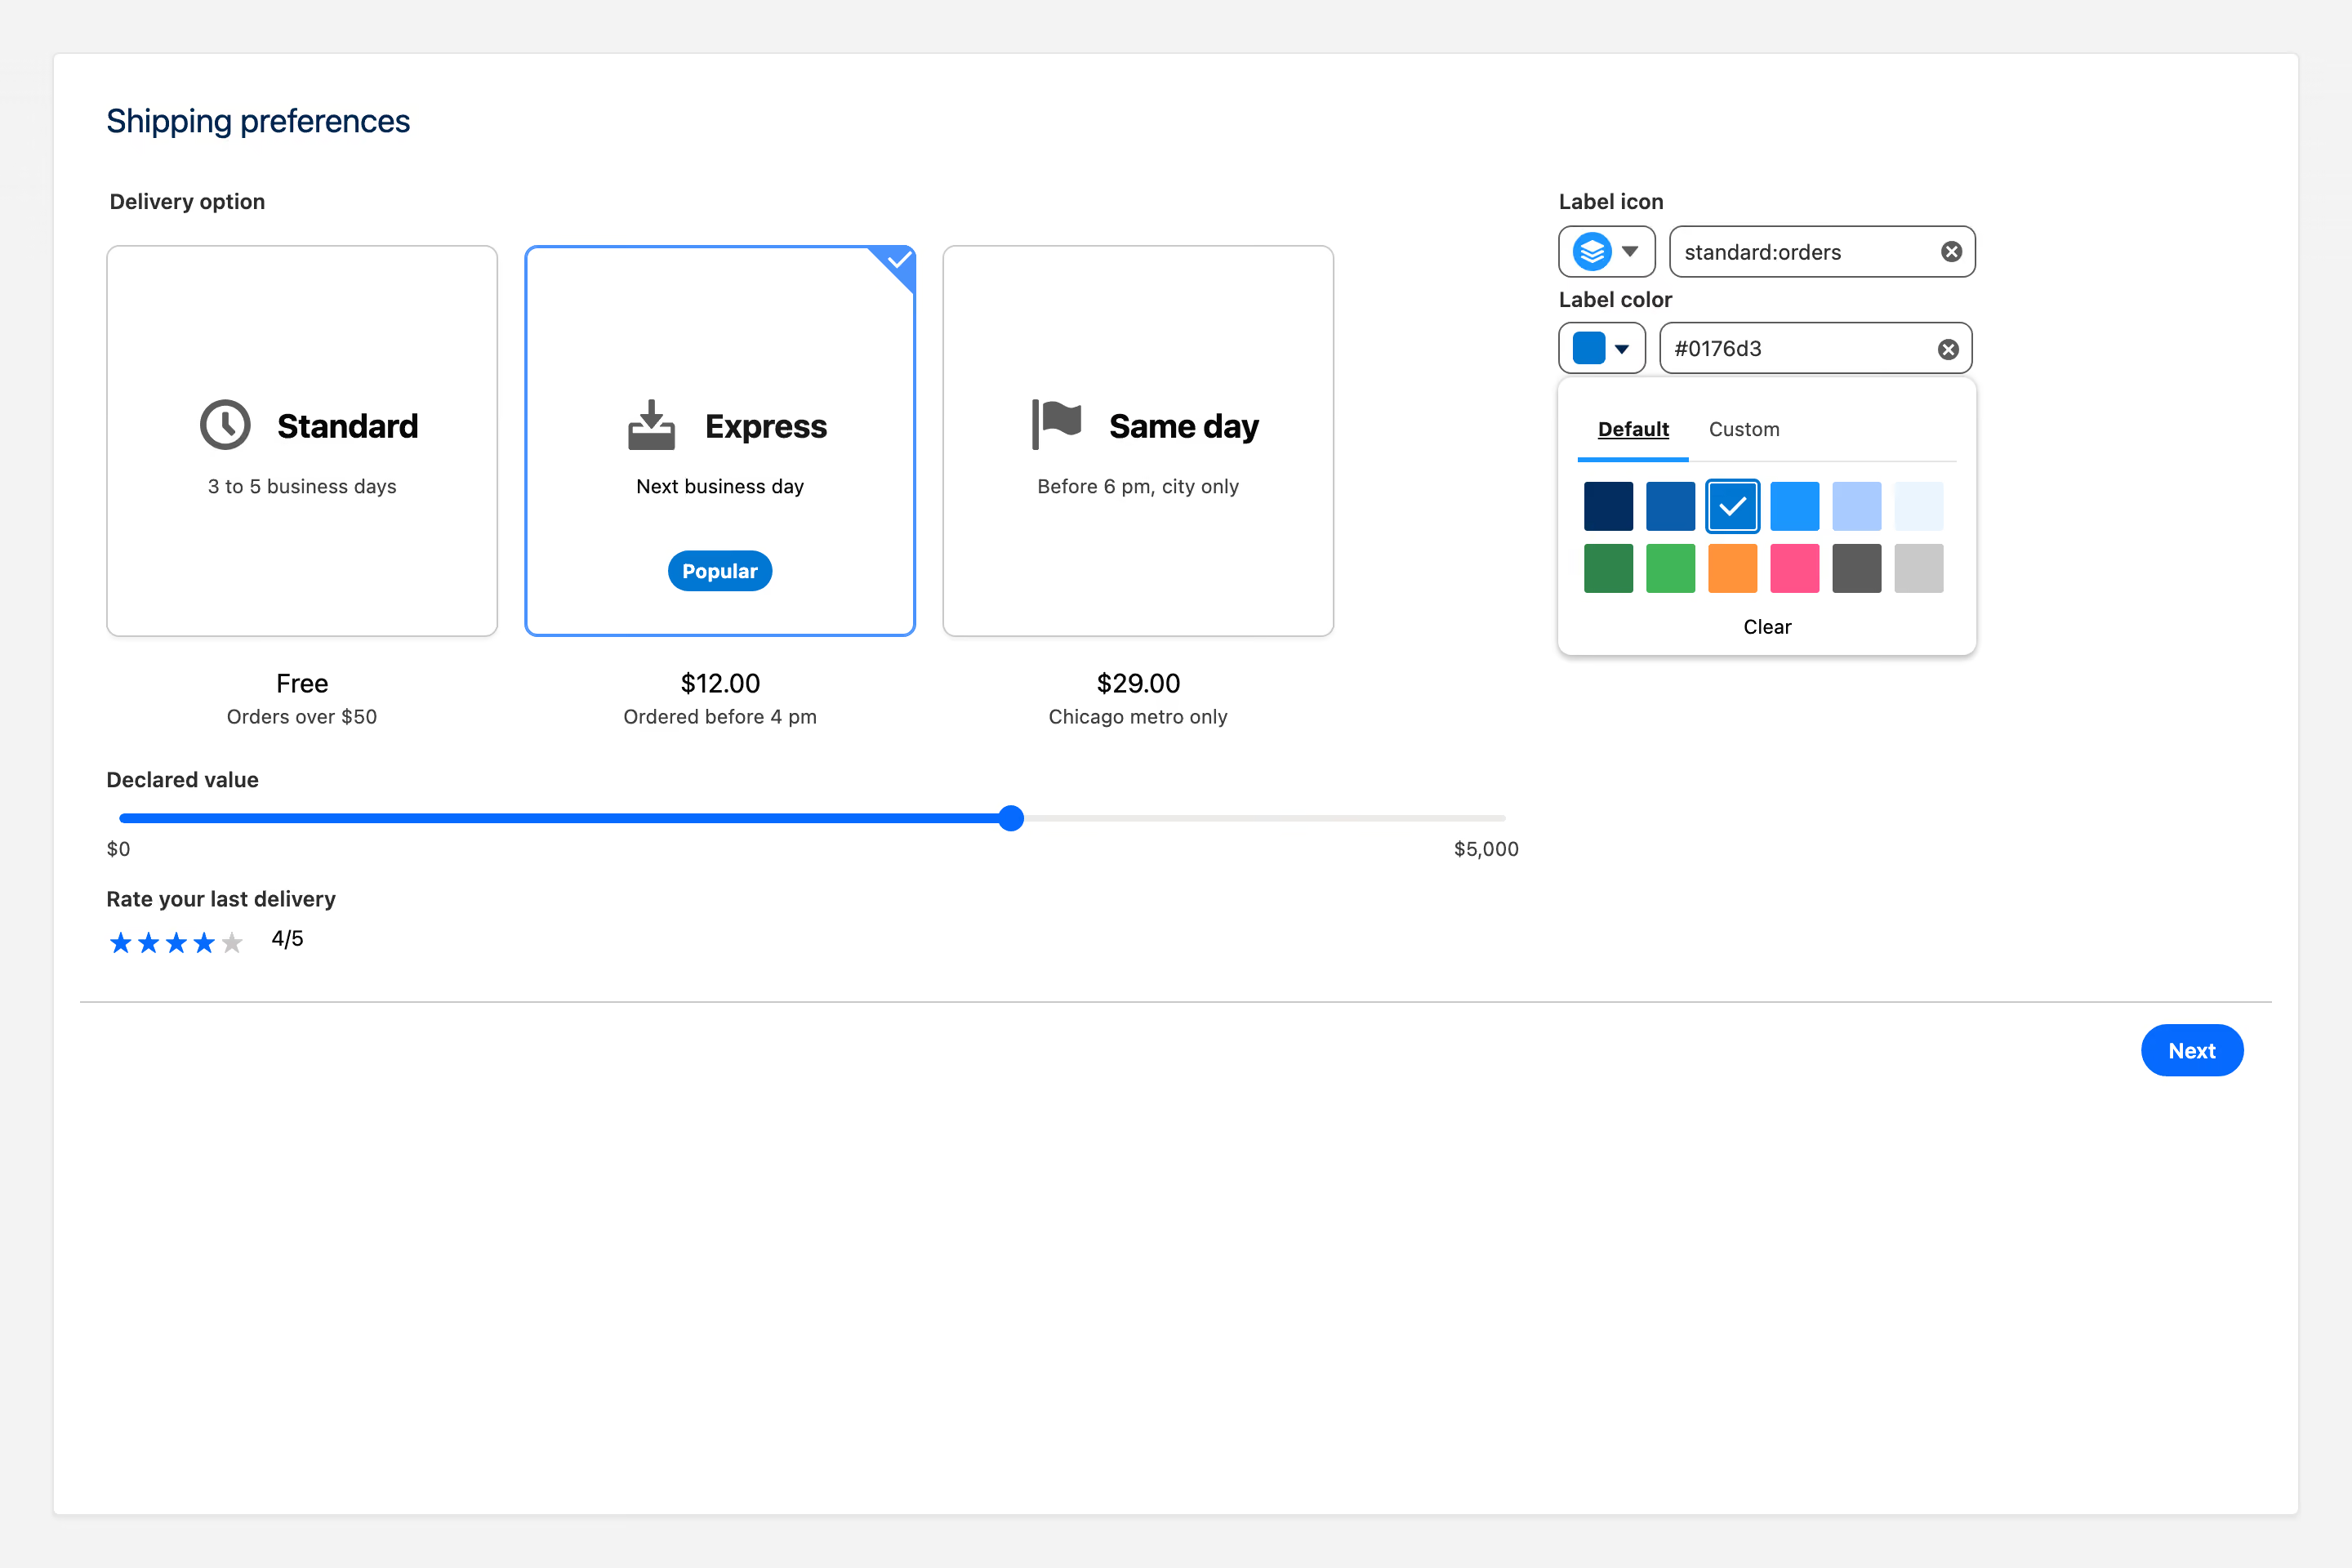
One focused screen: cards for the delivery choice, a slider for the declared value, a star rating instead of a number field.
Lean on conditional visibility. Hiding irrelevant fields based on prior inputs keeps screens focused. Most components support it natively. Use it aggressively — the fewer fields a user sees at any one moment, the better.
Wire variables before styling. Configuring a component's appearance before figuring out how its value flows downstream always costs time later. Do the variable mapping first.
For multi-field interactions, use reactive components. If one field's value should change what a user sees elsewhere on the same screen, reference that variable in the dependent component's properties and it updates automatically. Simpler logic, better UX.
If your users are in the field, test on mobile before you go live. Flow screens that look fine on desktop regularly fall apart on the Salesforce mobile app. Discover this before your users do.
More screens with fewer fields is almost always better than one overwhelming form. Users finish multi-step flows. They abandon walls.
Common Screen Flow Problems — and How to Fix Them
Six issues that come up constantly. The causes are almost always the same.
Component doesn't appear at runtime
Visible in Flow Builder, gone when the flow runs. Either a conditional visibility rule evaluates to false on load, or the component depends on a variable that's null at that point. Do a debug run and inspect variable values at that screen. If the variable is null, initialize it with a Default Value or an Assignment element before the screen element.
Flow works in preview but breaks for end users
Preview runs as the admin. Production runs as the user. If the running user's profile lacks access to a record, field, or object the flow references, it errors silently or throws a generic message. Check FLS and object permissions for the target profile, then use Flow Debug with Run As set to a test user in that profile to see exactly what they see.
Mobile layout is broken
Screen Column components don't stack on mobile — they stay side by side on small screens, which makes narrow columns unusable. Test on the Salesforce mobile app, not just a resized browser window. For mobile-first flows, drop Screen Column and use Section components to group related fields. Keep each screen to five or fewer inputs.
Third-party component not showing in Flow Builder
Package installed, component missing from the sidebar. Usually a missing permission set — most managed packages require one before the components appear. Check the AppExchange listing for required permission sets. For Avonni, the permission set is called Avonni Components and needs to be assigned to anyone building or running flows with Avonni components.
Experience Cloud flow errors for external users
Works internally, breaks for guest users. Verify the flow has Make available for Experience Builder sites enabled in Setup → Flows. Then audit the Guest User profile's object and field permissions against everything the flow touches — Get Records queries included. Guest users have no access by default; every record, field, and object the flow needs must be granted explicitly.
Reactive component not updating
Wiring looks right but the dependent component doesn't refresh. Confirm the source component's API Name matches the variable name you're referencing in the dependent component's property exactly. Also check the Salesforce documentation for which specific properties on each component support reactive updates — not all properties on all components are reactive, whatever release your org is on. Run a debug session and watch the variable value after each interaction.
Frequently Asked Questions
Can you use Lightning Web Components in screen flows?
Yes. Any LWC that implements the lightning/flowSupport interface can be registered as a flow screen component. Third-party packages like Avonni work this way — every component is an LWC built for flow screen use. You can also build your own, but that requires a developer and maintenance work across each Salesforce release.
What's the difference between a Screen Flow and other Salesforce flow types?
Salesforce has five flow types: Screen Flow, Record-Triggered Flow, Scheduled Flow, Autolaunched Flow, and Platform Event-Triggered Flow. Screen Flows are the only type with a user-facing UI — the only type where screen components matter at all. If someone can see and interact with it, it's a Screen Flow. The others run in the background automatically.
What are reactive screen components, and do I need them?
Reactive components, GA since Winter '24, let components on the same screen respond to each other without navigation — a toggle shows a section, a picklist filters another picklist, a slider updates a live display. The wiring is variable references: one component writes to a variable, another reads from it. You need them when one component's value should change what the user sees elsewhere on the same screen. For simple linear forms with no cross-component dependencies, they're not necessary.
When should I build a custom LWC instead of using a managed package?
Build custom when the behavior is genuinely unique to your org — proprietary logic, a deeply specific integration, or a design requirement no package can match. Use a managed package when the component you need is a recognized pattern (calendar, data table, card picker, kanban). Custom LWCs add developer dependency and maintenance overhead; managed packages stay maintainable by admins across every release.
What does "This screen includes screen components that require Lightning runtime" mean?
Some screen components, including Lookup and any custom Lightning component built for flow screens, only run in Lightning runtime. If your org still runs flows in Classic runtime, Flow Builder shows this warning and the component won't display. Go to Setup, then Process Automation Settings, and turn on Enable Lightning runtime for flows. Test your existing flows afterwards, since some Classic flows can behave differently.
How do I show a dropdown of records or picklist values on a flow screen?
Use a choice resource with a Picklist, Radio Buttons or Choice Lookup component. A Picklist Choice Set reads the values of an existing picklist field, so new values show up in the flow automatically. A Record Choice Set builds the options from a filtered list of records, and can store fields of the selected record in flow variables. The Choice Lookup component adds a search box: it only supports Text values, loads up to 1,020 choices, and doesn't work on mobile.
One More Thing
The native components cover most of what you'll build. For the flows where UX actually matters — where someone is going to use this every day, or where a customer is going to see it — that 20% gap is worth taking seriously.
The decision isn't complicated: native first, UnofficialSF if it's free and fast, managed package when you're building at scale or the stakes are higher. Most orgs end up using all three at different points.
If you want to see what the managed side looks like, the Avonni Flow Screen Components library has a free AppExchange trial.




%20(Vignette%20YouTube)%20(11).png)




%20(Vignette%20YouTube)%20(81).png)